68 Sheets: What an Interior Design Project Actually Includes
Interior
"Just go ahead and build it" - that sentence starts most renovations that end up being redone. The contractor gets a few Pinterest images, the builder's floor plan, and a request to make it "look modern." Everything else gets decided on site: where the outlets go, how high the switches sit, where the range hood vents, how much tile to order, how deep the curtain pocket needs to be.
An interior design project is often thought of as a set of beautiful renderings. In reality, the rendering is only the visible part. Underneath it sits the working documentation: the drawings that let framers, electricians, ceiling installers, tile setters, and cabinetmakers do their work without guessing.
To show what an interior design project actually contains, we'll walk through the real drawing set from one of our projects: a 118 m² (about 1,270 sq ft) apartment in Kharkiv with nine rooms - entry, guest bathroom, kitchen, living room, hall, home office, bedroom, primary bathroom, and walk-in closet.
You can see the finished interior of this apartment in full in our portfolio: the minimal-style project.
The set runs to 68 sheets at A3 size. Renderings take up 24 of them. In other words, nearly two-thirds of the project is drawings - drawings most clients don't even know exist, but without which a renovation turns into a chain of decisions made on the fly.
Below: what those sheets are, which trade uses each one, and what their absence really costs - especially in a market like the US, where every specialist's hour is expensive.
Stage 1. Record what's actually there
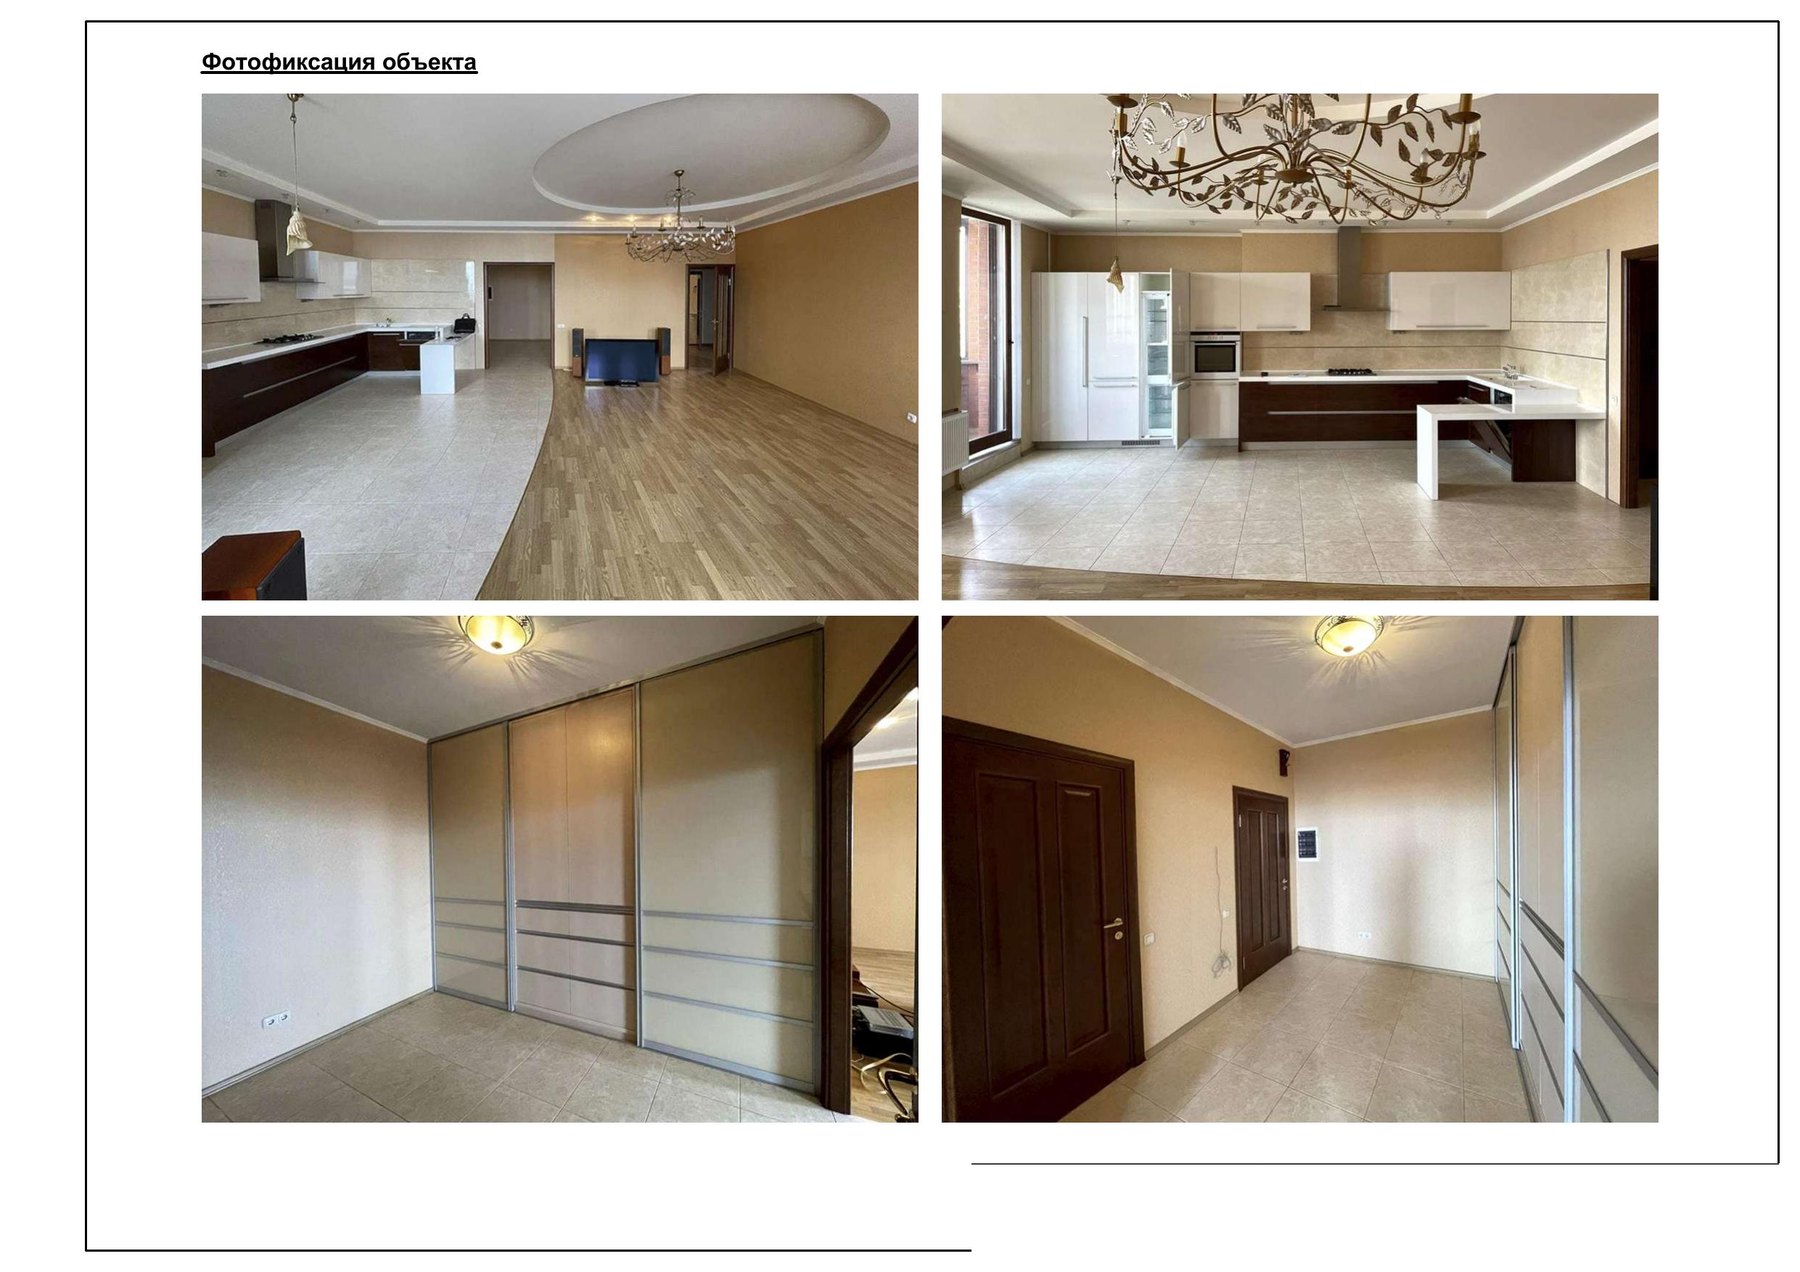
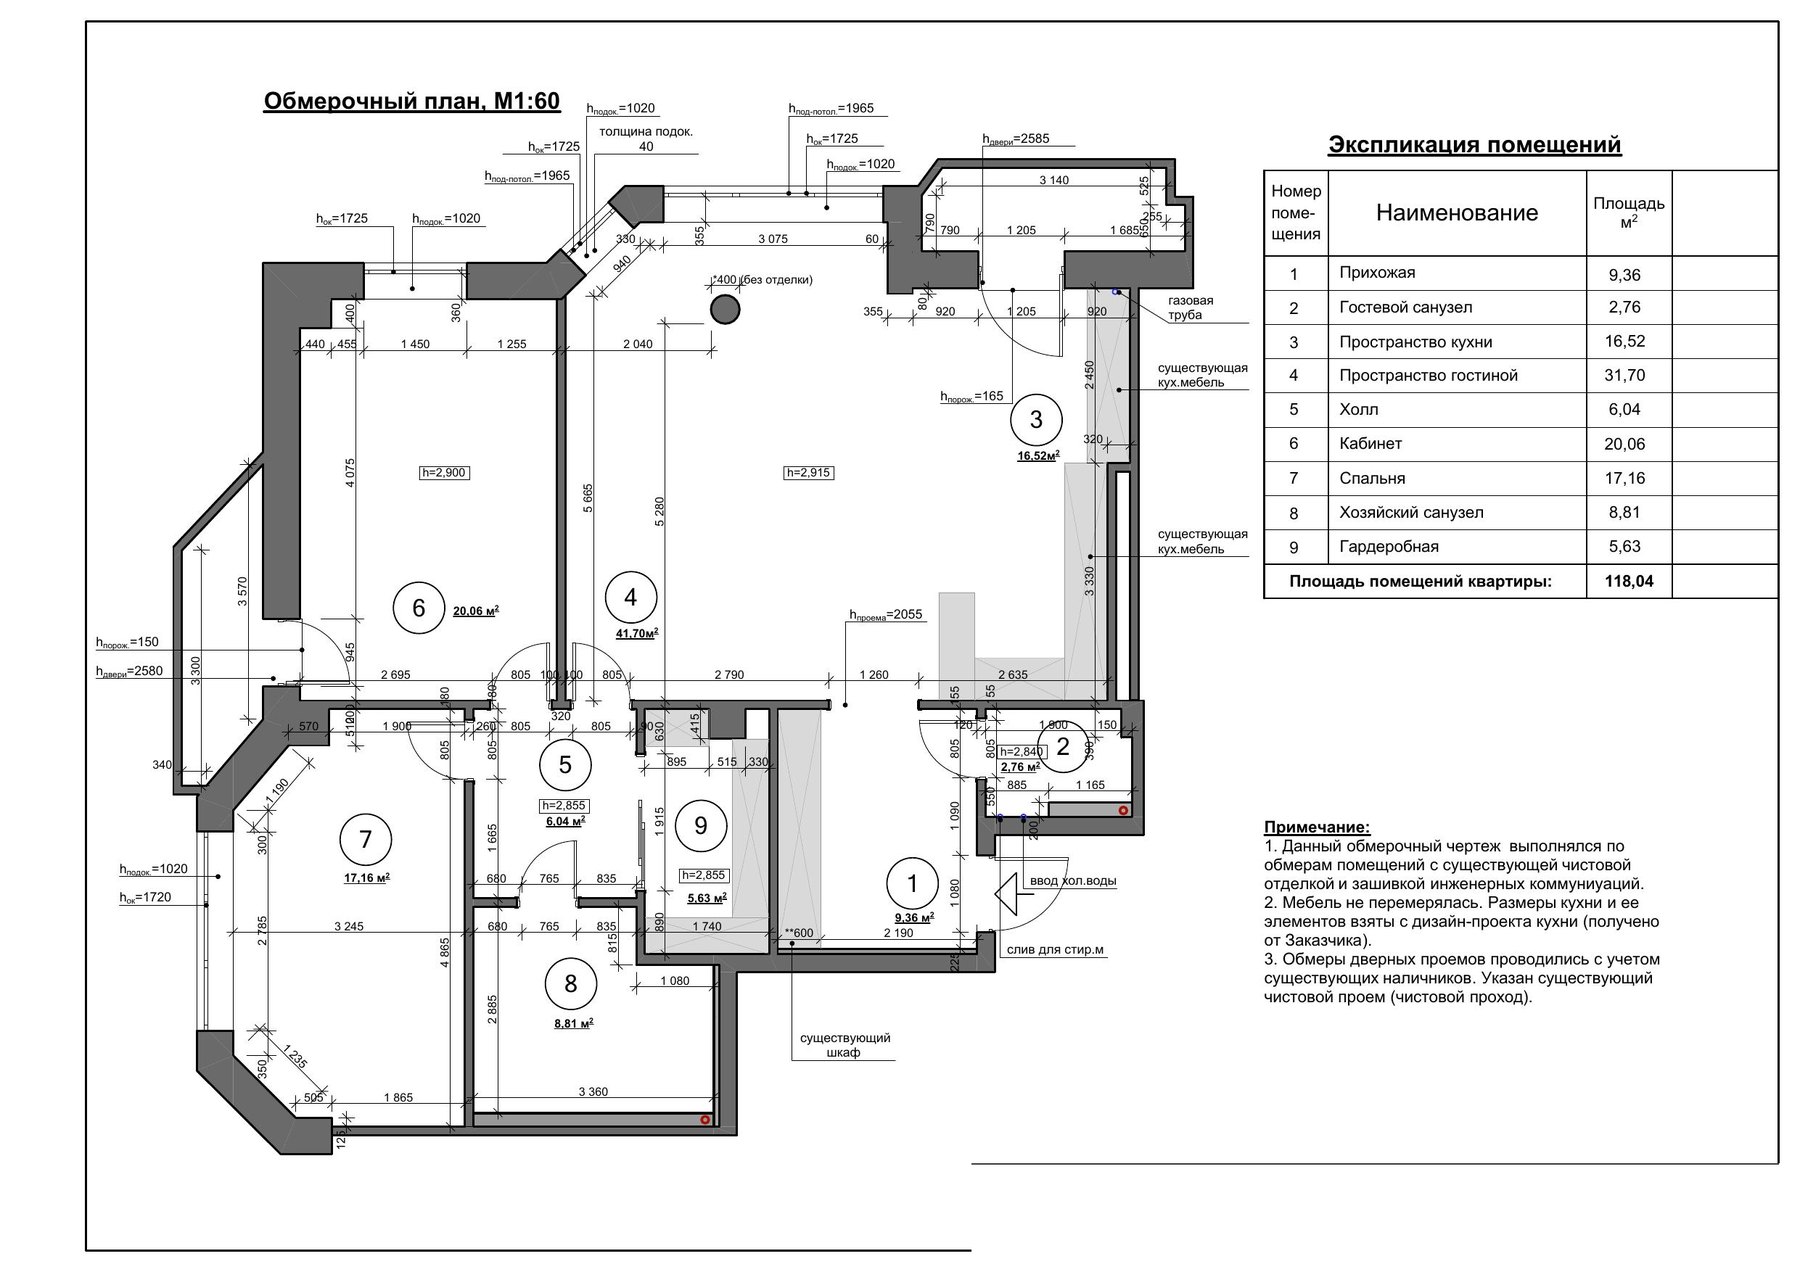
A project starts with facts, not ideas. The first sheets in the set are a photo survey of the existing condition and a measured plan.
The measured plan captures real room dimensions, ceiling heights, sill heights, and the positions of risers, radiators, windows, and door openings. Every decision that follows - from furniture placement to tile layout - rests on those numbers. If the measurements are off, everything built on them is off.
The notes in the set state it plainly: the project was drawn from measurements taken over existing finishes and must be adjusted after demolition. That's not a formality. Behind old plaster, a wall can turn out to be a few centimeters out of plumb, and a professional set anticipates that up front instead of discovering it after the kitchen has already been built to size.
Another detail from the notes: every elevation is dimensioned from finished floor level, set as 0.000. When five crews work on one site, a single datum is what separates straight lines from "roughly the same height." Without it, the electrician measures from the subfloor, the tile setter from their tile, the cabinetmaker from the flooring - and the outlets on the kitchen backsplash drift by an inch.
Stage 2. Space planning: decisions you can't take back later
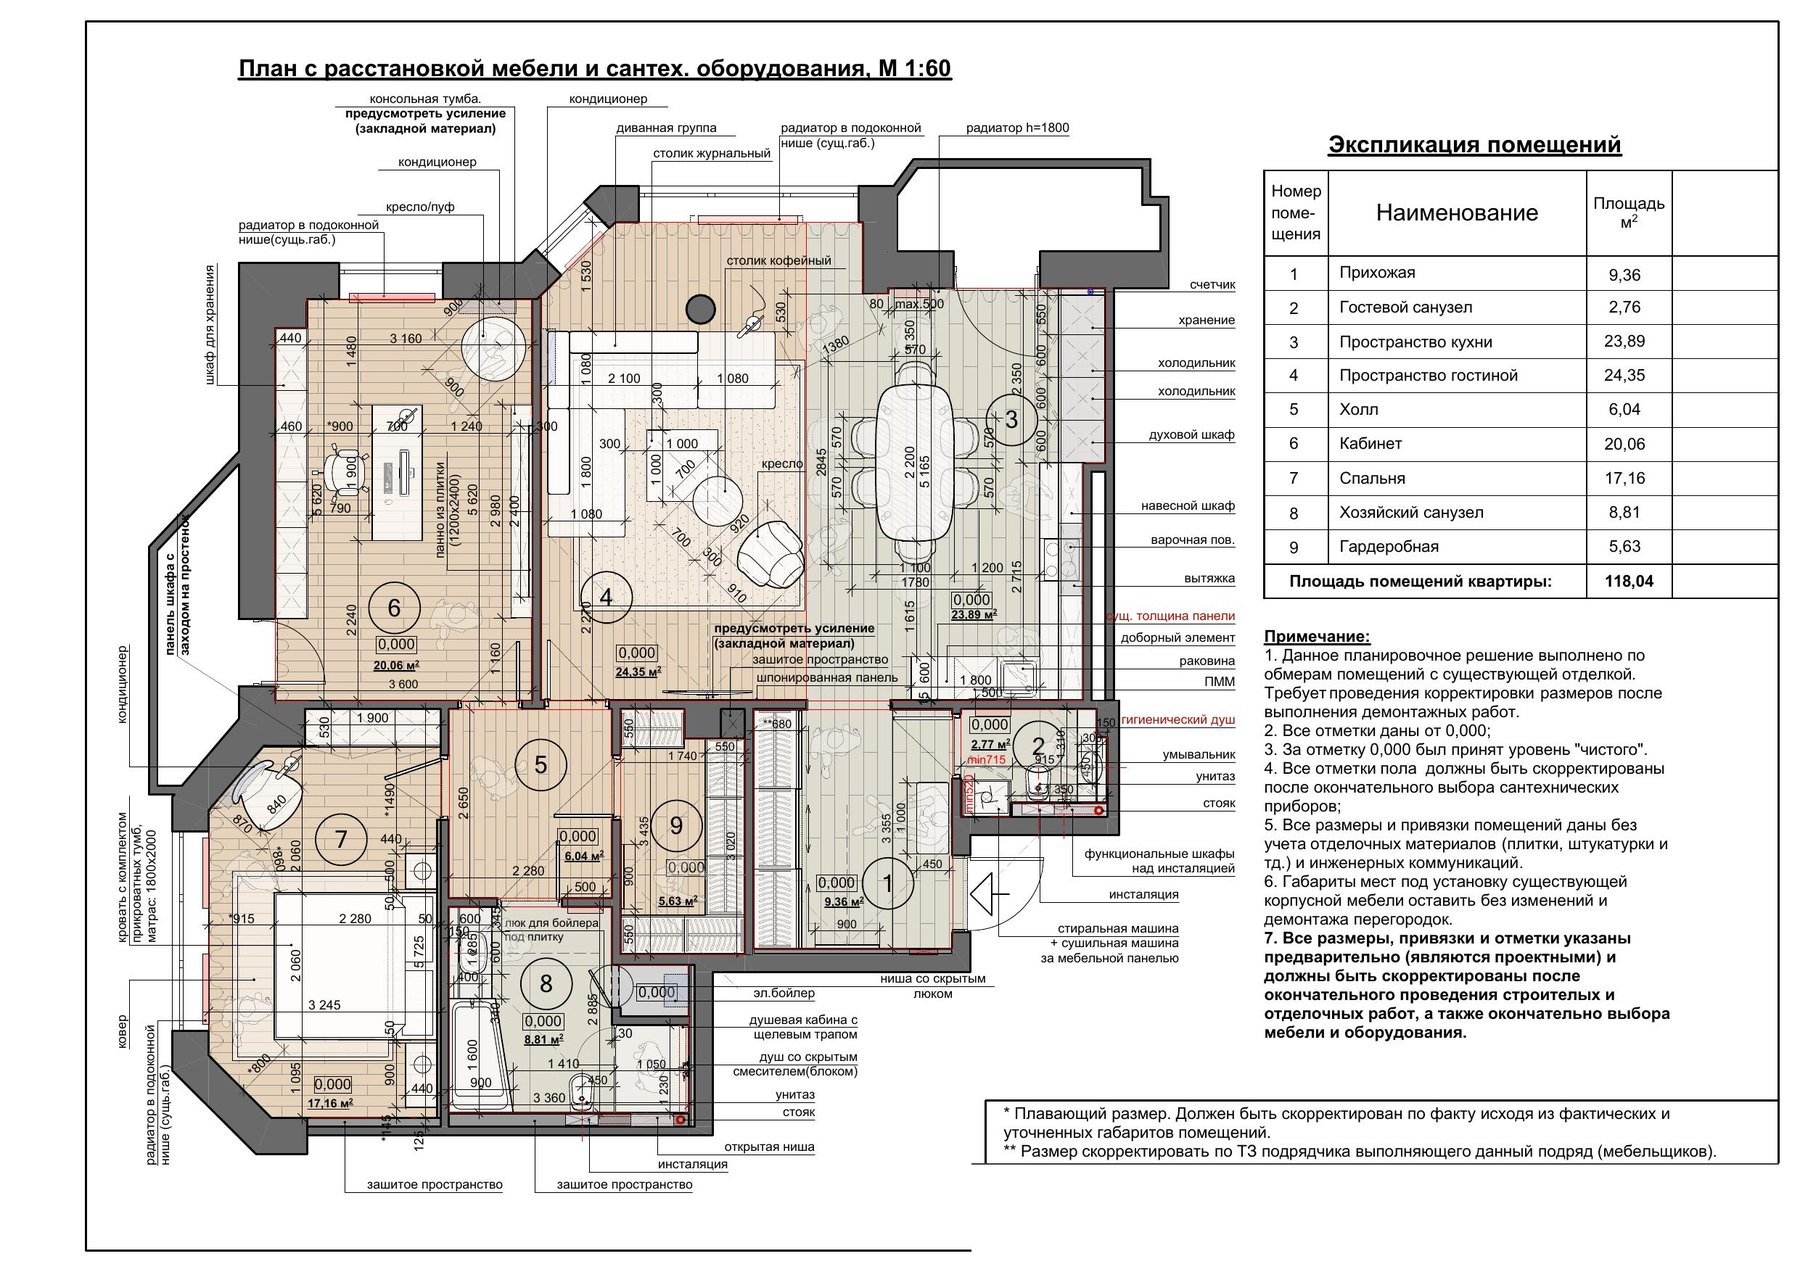
The furniture and plumbing fixture layout is the central sheet of the entire project. It shows how the apartment works: where the sofa sits relative to the TV, how much clearance remains between the dining table and the kitchen, how the doors swing, where the bed goes and which side you approach it from.
The plan includes a room schedule with the area of each space: kitchen 23.89 m², living room 24.35 m², office 20.06 m², bedroom 17.16 m², primary bathroom 8.81 m². And this sheet already carries notes that prevent rework - "provide blocking" under the wall-hung console. Wall-mounted furniture can't be anchored securely to an ordinary drywall partition; solid wood blocking or plywood has to go in before the wall is closed. If someone remembers after finishing, the wall gets opened back up.
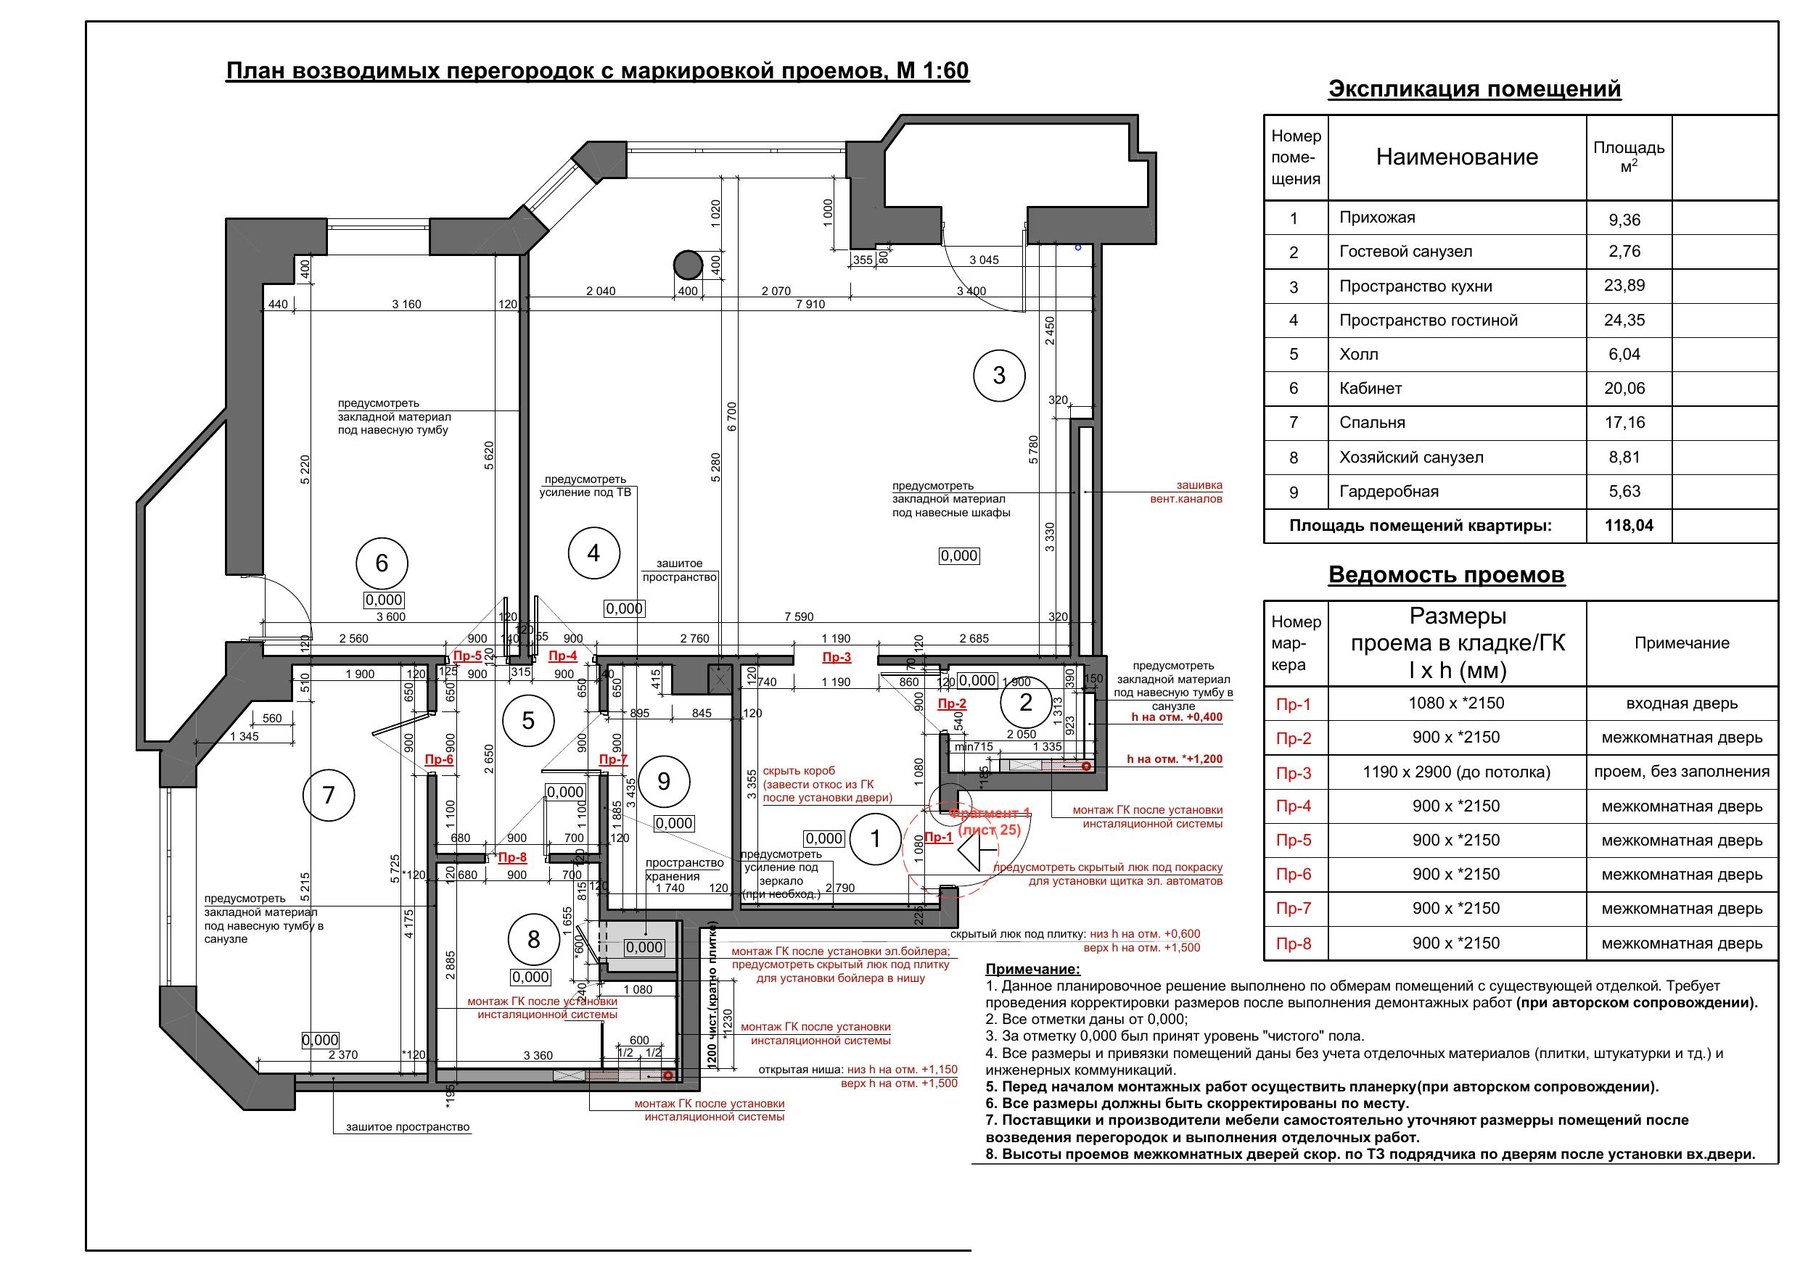
The next sheet is the partition plan with marked openings. This one is for the framing crew: exactly where each new wall goes, how thick it is, which door openings it has and at what height.
Without it, walls go up "per the sketch" - and then the door won't open past the closet, the walk-in is two inches short for a hanging rod, or the concealed door frame doesn't fit a standard partition. This is the stage where space planning and functional zoning gets locked in - and where a mistake costs the most, because everything after it is built on top.
Stage 3. MEP: a separate sheet for every trade
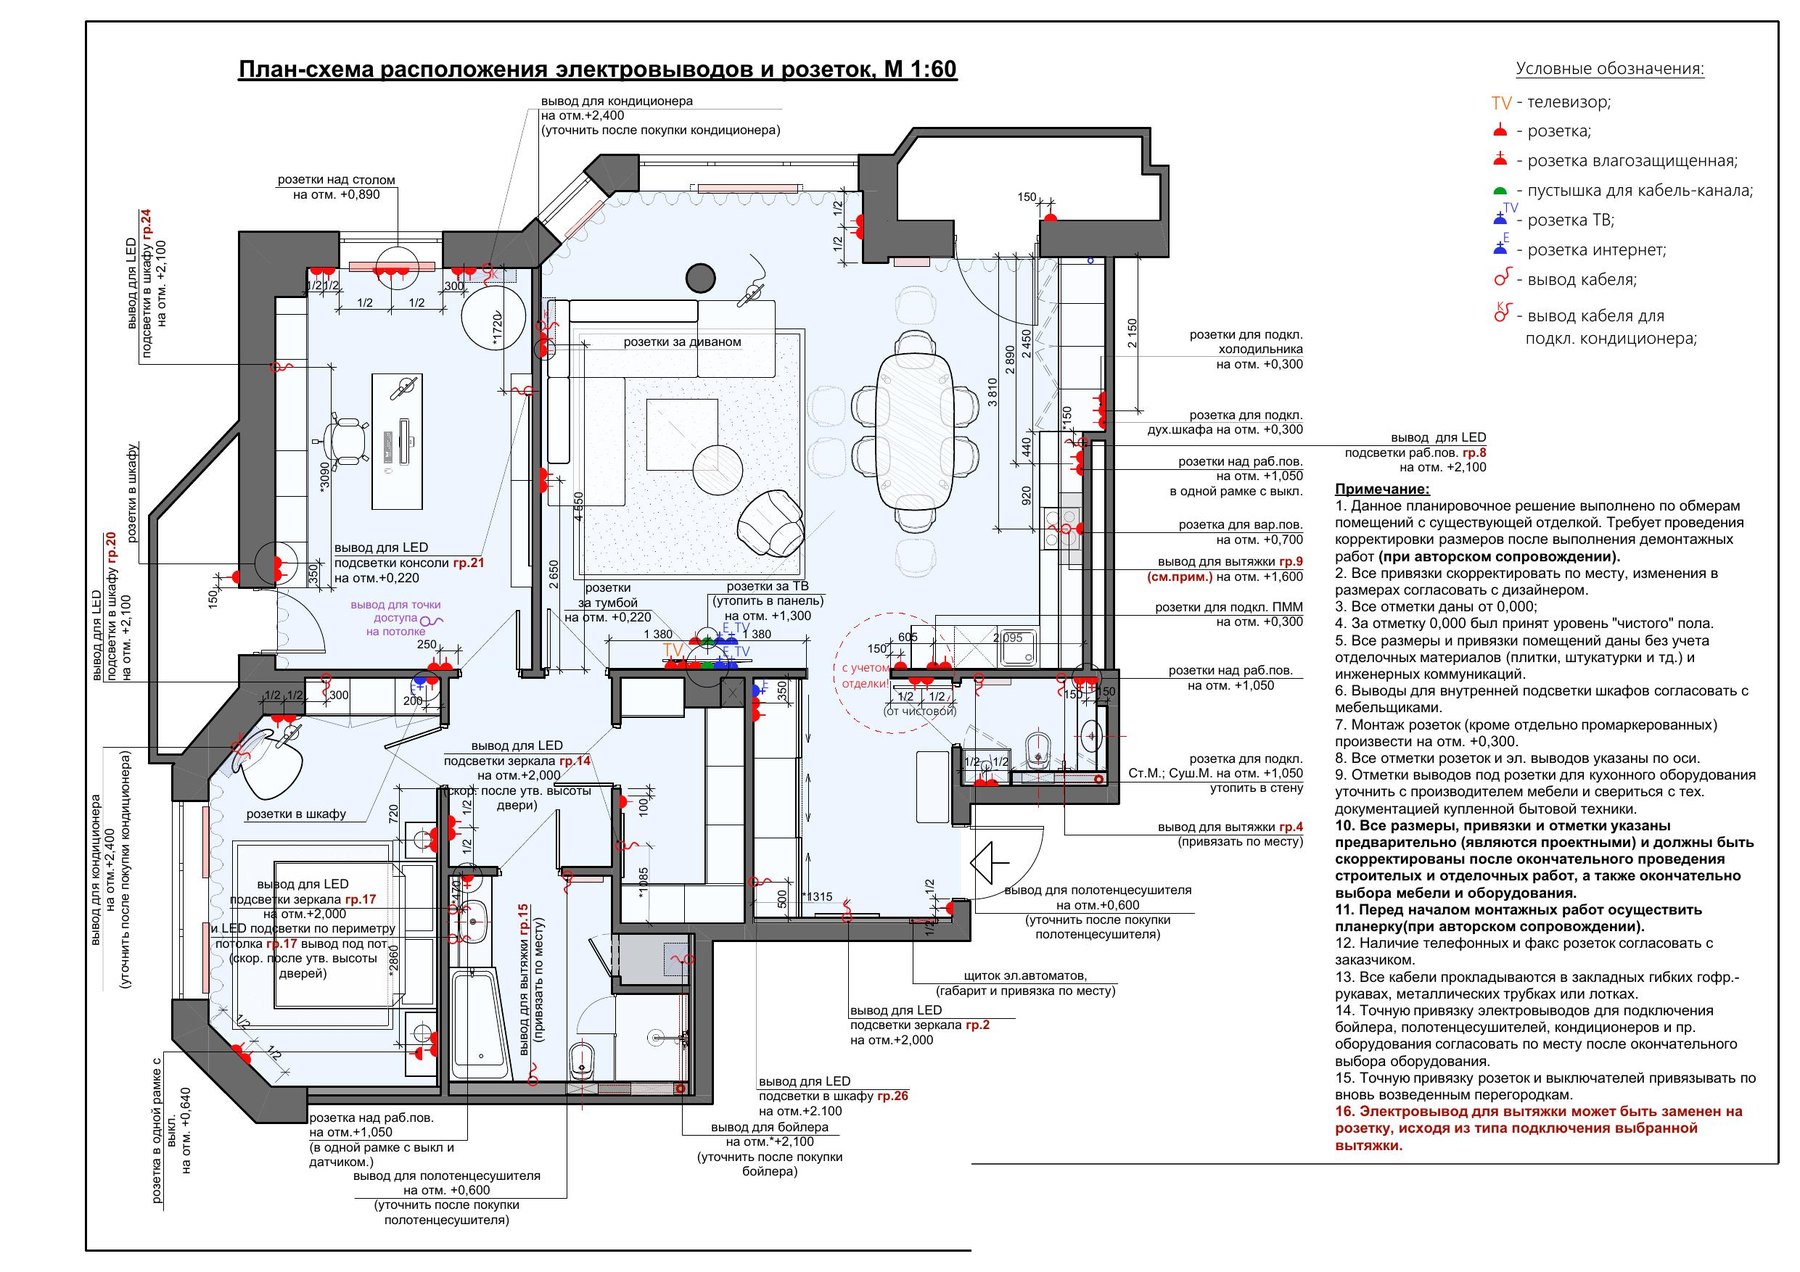
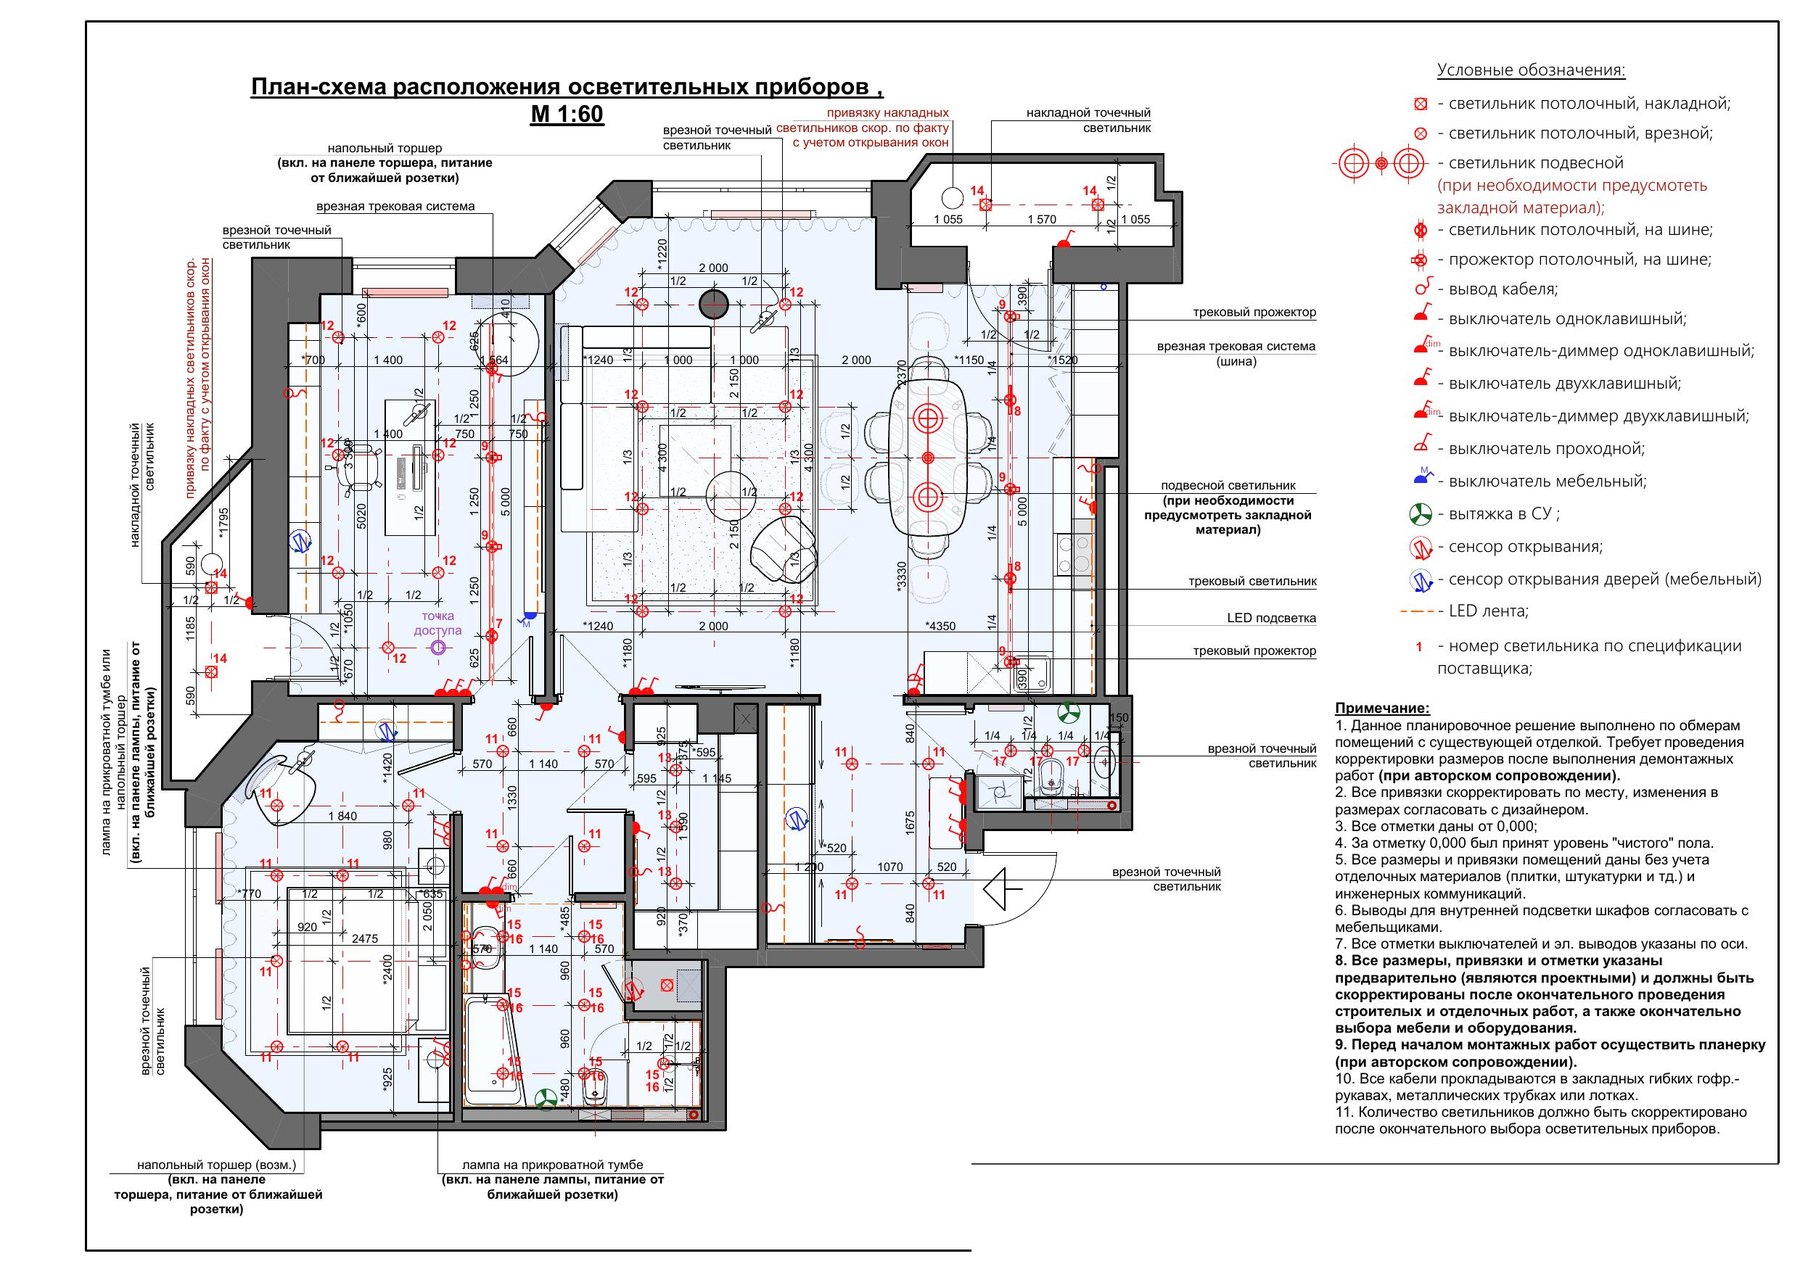
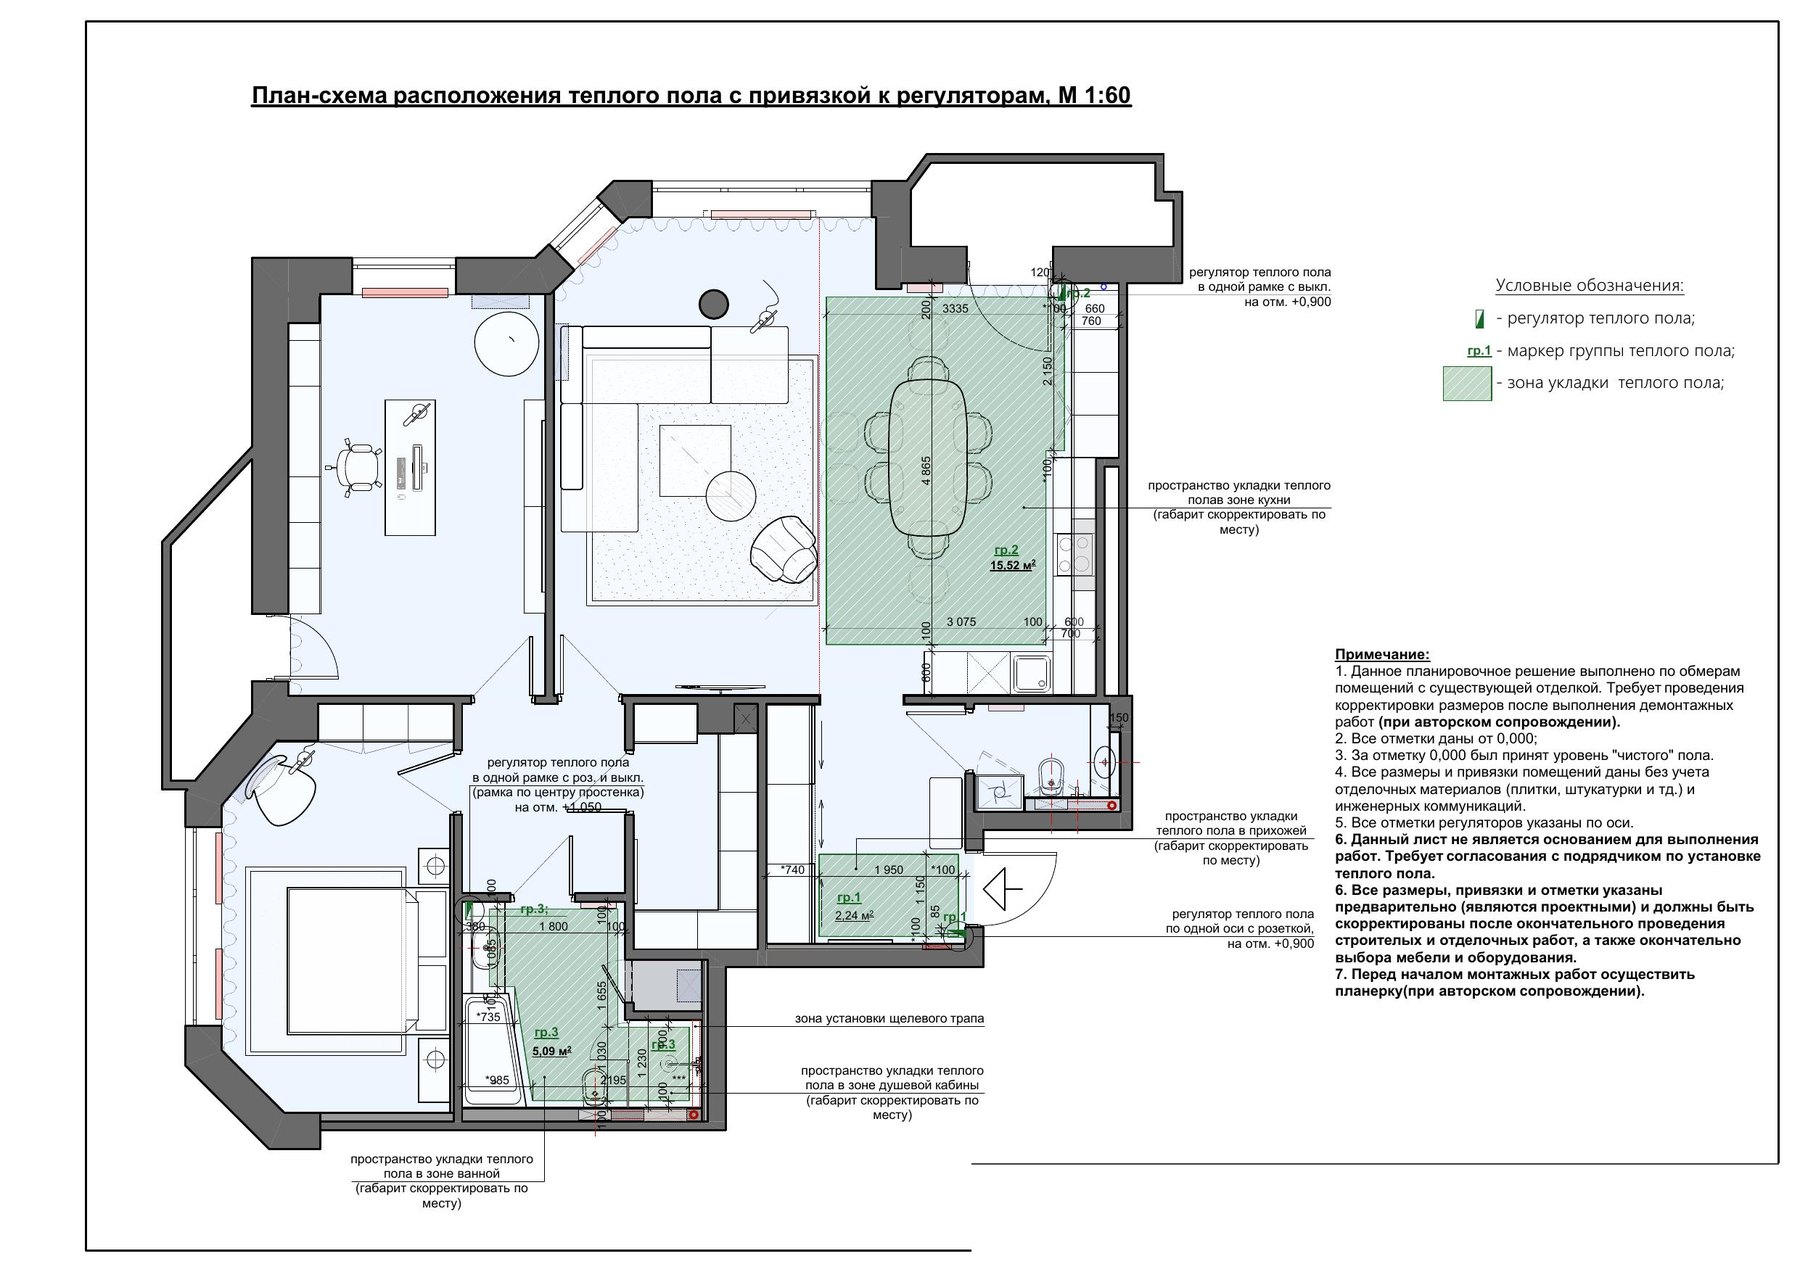
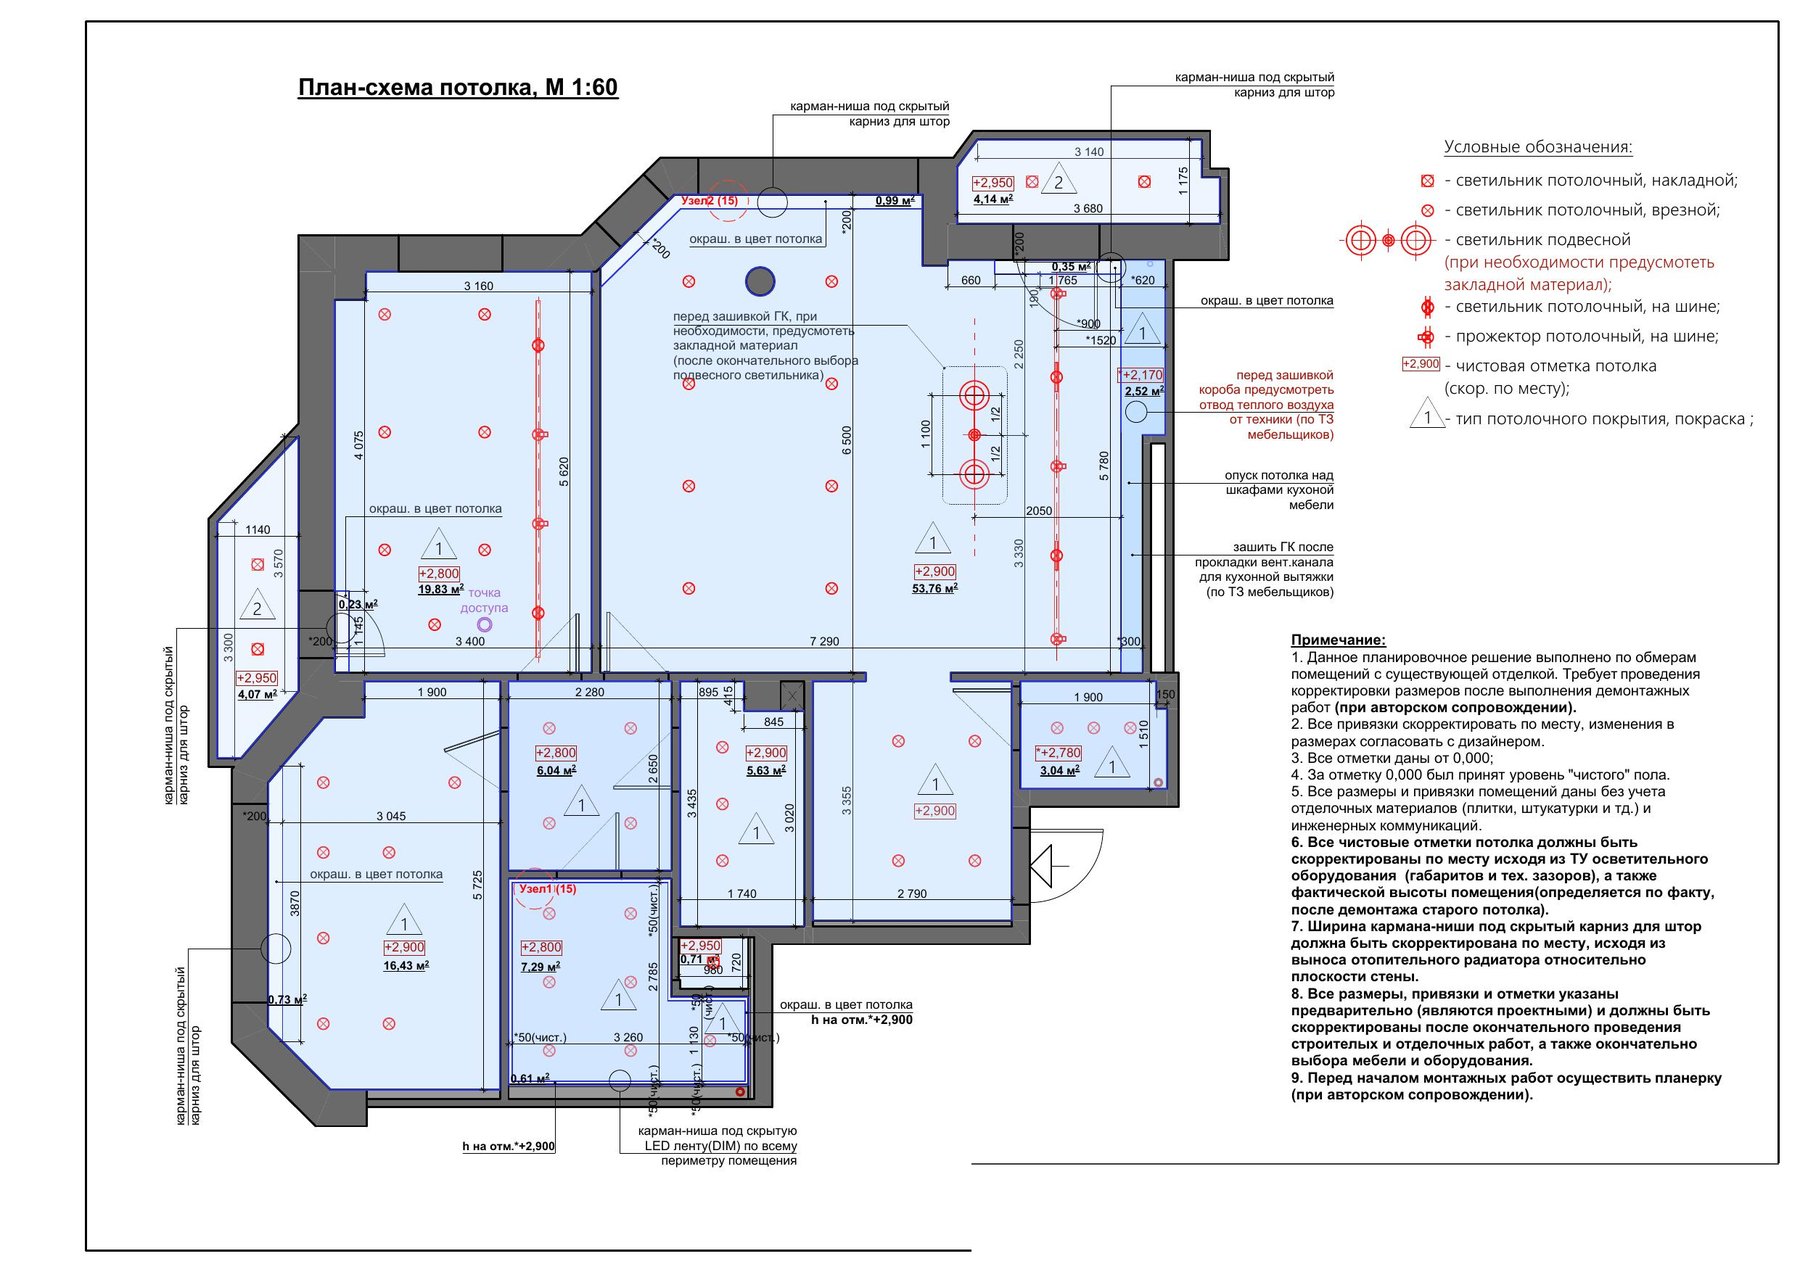
Next comes the part that gets cut most often "to save money" - and that most often ends with walls opened up after the finishes are done. In the set, every building system gets its own drawing: outlets and electrical points, switches with their circuits, lighting, radiant floor heating, air conditioning, and the ceiling with its details.
Outlets aren't a small detail. They're the most expensive small detail in a renovation
The outlet plan looks like the simplest sheet in the set. It's actually one of the hardest, because every point on it depends on the furniture, the appliances, the backsplash height, the bed and TV positions, even where someone will set their phone down to charge.
A professional electrical plan doesn't just say "outlet by the bed." For every point it specifies:
plan location - the distance from the nearest corner or opening centerline;
height above finished floor - because an outlet above a nightstand has to clear its top, not hide behind it;
type - single, duplex, USB, or weather-resistant near the sink and in the bathroom;
purpose - dedicated points for the wall oven, cooktop, dishwasher, AC unit, under-cabinet task lighting, and lighting inside closets and around mirrors.
The set we're reviewing includes details like an AC outlet at +2.400 m with the note "confirm after AC unit is purchased," points for LED lighting inside closets and behind the mirror's light line, and a note that the range hood connection may switch from a hardwired point to an outlet depending on the model chosen.
In the US, the electrical plan is also a code question. The National Electrical Code (NEC) requires, for example, that no point along a kitchen countertop be more than 24 inches from an outlet, that kitchens have at least two dedicated 20-amp small-appliance circuits, and that kitchen and bathroom outlets have GFCI protection. A designer who places outlets "for aesthetics" without accounting for these requirements creates a problem the inspector will find before the owner does.
What one misplaced outlet actually costs
Take the most ordinary scenario. An outlet was cut in without a plan - "somewhere around here." Once the furniture arrives, it turns out to be behind the side panel of a cabinet. It has to move 16 inches.
In an American home with drywall, that looks like this:
Electrician. Cuts a new opening, sets a new box, extends the circuit. Splicing the wires and burying the connection inside the wall isn't allowed - code requires every splice to sit in an accessible junction box. So it's either a new cable run from the nearest point, or a box that stays accessible. In the US, just the electrician's service call typically runs $75-200 and covers the first hour, and some contractors bill a minimum of one to four hours regardless of how long the job actually takes.
Drywall finisher. The old opening needs a patch, tape, and at least three coats of joint compound - tape coat, fill coat, finish coat - with drying and sanding in between. That's two to three days, which means two to three visits. Then the wall texture has to be matched: orange peel or knockdown, which covers most American interiors. A small drywall repair with texture matching in Seattle runs $300 to $500.
Painter. The patch gets primed and painted. But touched-up paint almost always "flashes" against the old finish under raking light, so the whole wall often gets repainted corner to corner. Touching up one patch adds around $150; a full wall costs more.
Bottom line: one outlet in the wrong spot costs $550-850 or more in the Seattle area, three different trades, several days of waiting, and dust in a finished interior. And that's if there's only one. In practice, when outlets were placed without a plan, it's rarely one - more often five to seven, and each one triggers the same chain reaction.
In Ukraine the prices are different, but the logic is the same: chasing into concrete or brick, filling the old chase, skim coating, sanding, repainting. Add a tiled kitchen backsplash and moving a single outlet turns into replacing several tiles from a batch that may no longer be available.
Lighting, radiant heat, ceiling
Switches mapped to their circuits get their own sheet, so lights turn on where you walk into the room - and the right lights: general, accent, or task. Lighting fixtures get another sheet, with the type of each: surface-mount, recessed, track, or linear.
Radiant floor heating mapped to its thermostats shows where the loops run, the zone each one covers, and where the thermostat goes. In this set, the thermostat shares a multi-gang plate with a switch at +0.900 m, so the wall doesn't end up with another random control.
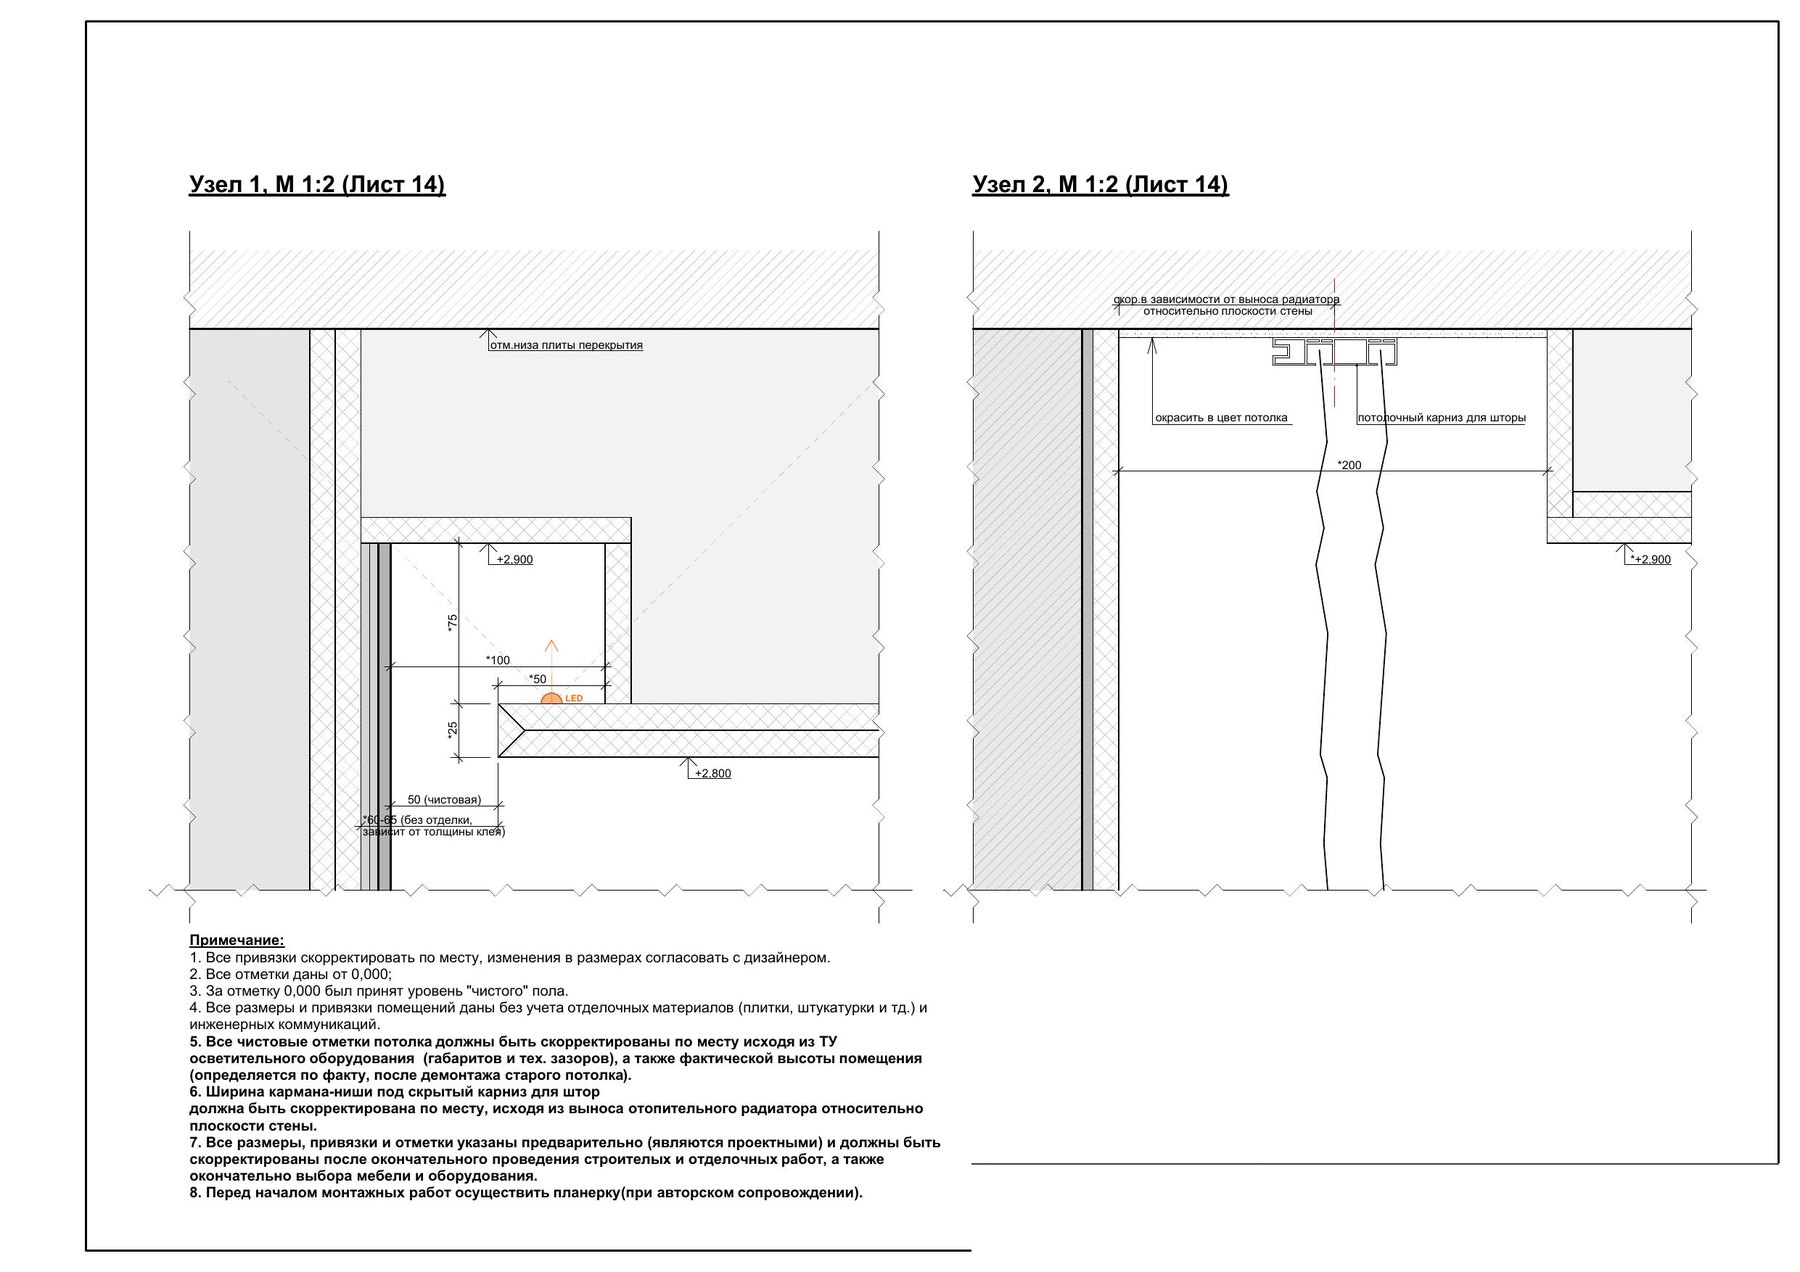
The reflected ceiling plan shows levels, soffits over the kitchen, and pockets for concealed curtain tracks. With it come details at 1:2 scale: exactly how the ceiling meets the wall at the radiator and how the curtain pocket is built. The ceiling installer works straight from this sheet, and it decides whether the track disappears completely or the edge of the profile shows.
Every one of these drawings is for a specific person on site. The electrician shouldn't have to guess where the cabinet will be. The ceiling installer shouldn't be deciding how deep the curtain pocket should be. When those sheets don't exist, the decision falls to whoever shows up first - and it's usually convenient for them, not for you.
Stage 4. Finishes: materials with exact quantities
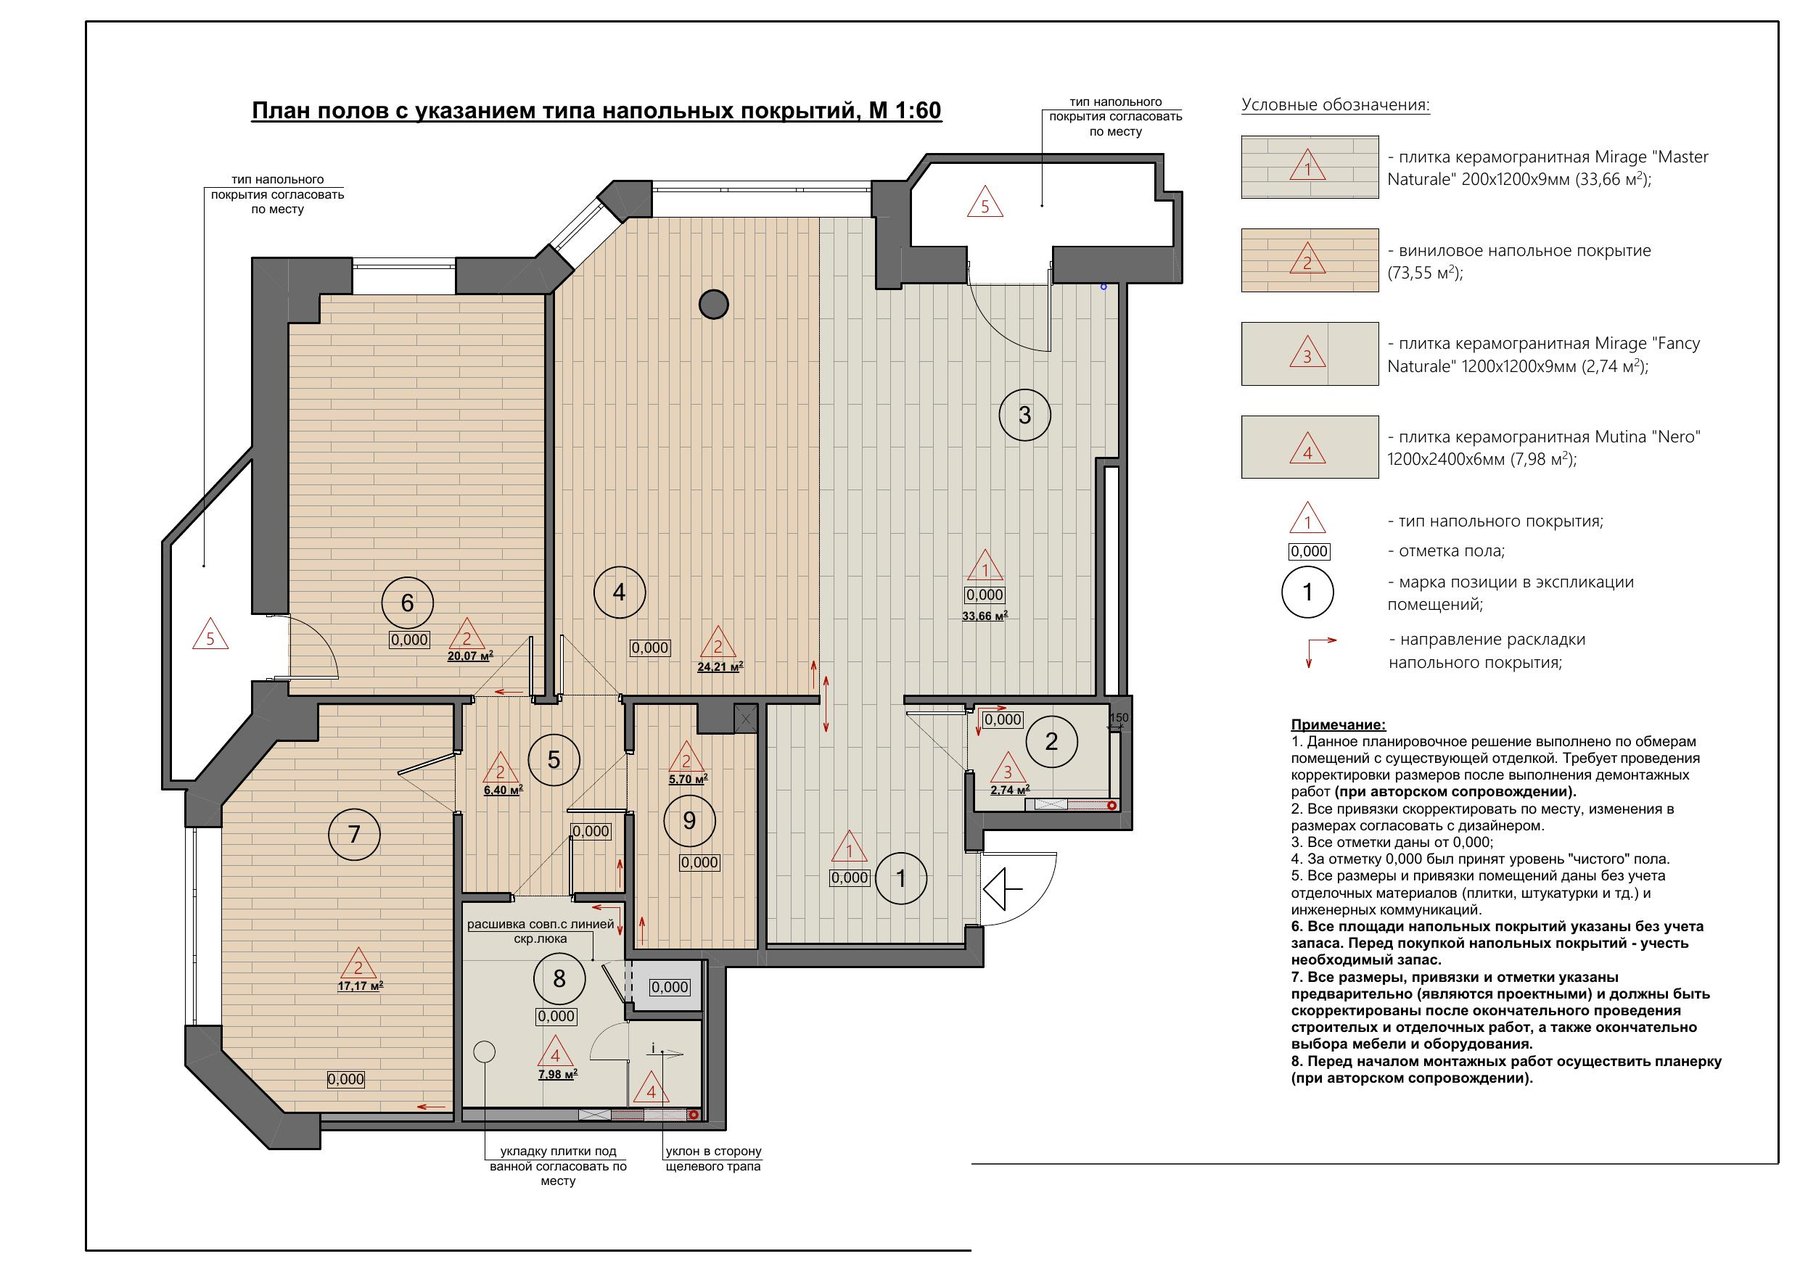
The flooring plan doesn't just say "tile in the bathroom, laminate in the bedrooms." It names specific materials, formats, and the area of each: Mirage Master Naturale porcelain at 200×1200 mm - 33.66 m², vinyl flooring - 73.55 m², Mirage Fancy Naturale porcelain at 1200×1200 mm - 2.74 m², Mutina Nero porcelain at 1200×2400 mm - 7.98 m². The plan also marks the lay direction and the finished floor elevation in every room.
In effect, it's a ready-to-send order for the supplier. One important note: areas are listed without waste allowance, and overage has to be added before ordering. That precision is the difference between one correct order and "ordered by eye, ran short, ordered more - and the new batch is a different shade." This is the work we do as part of material selection.
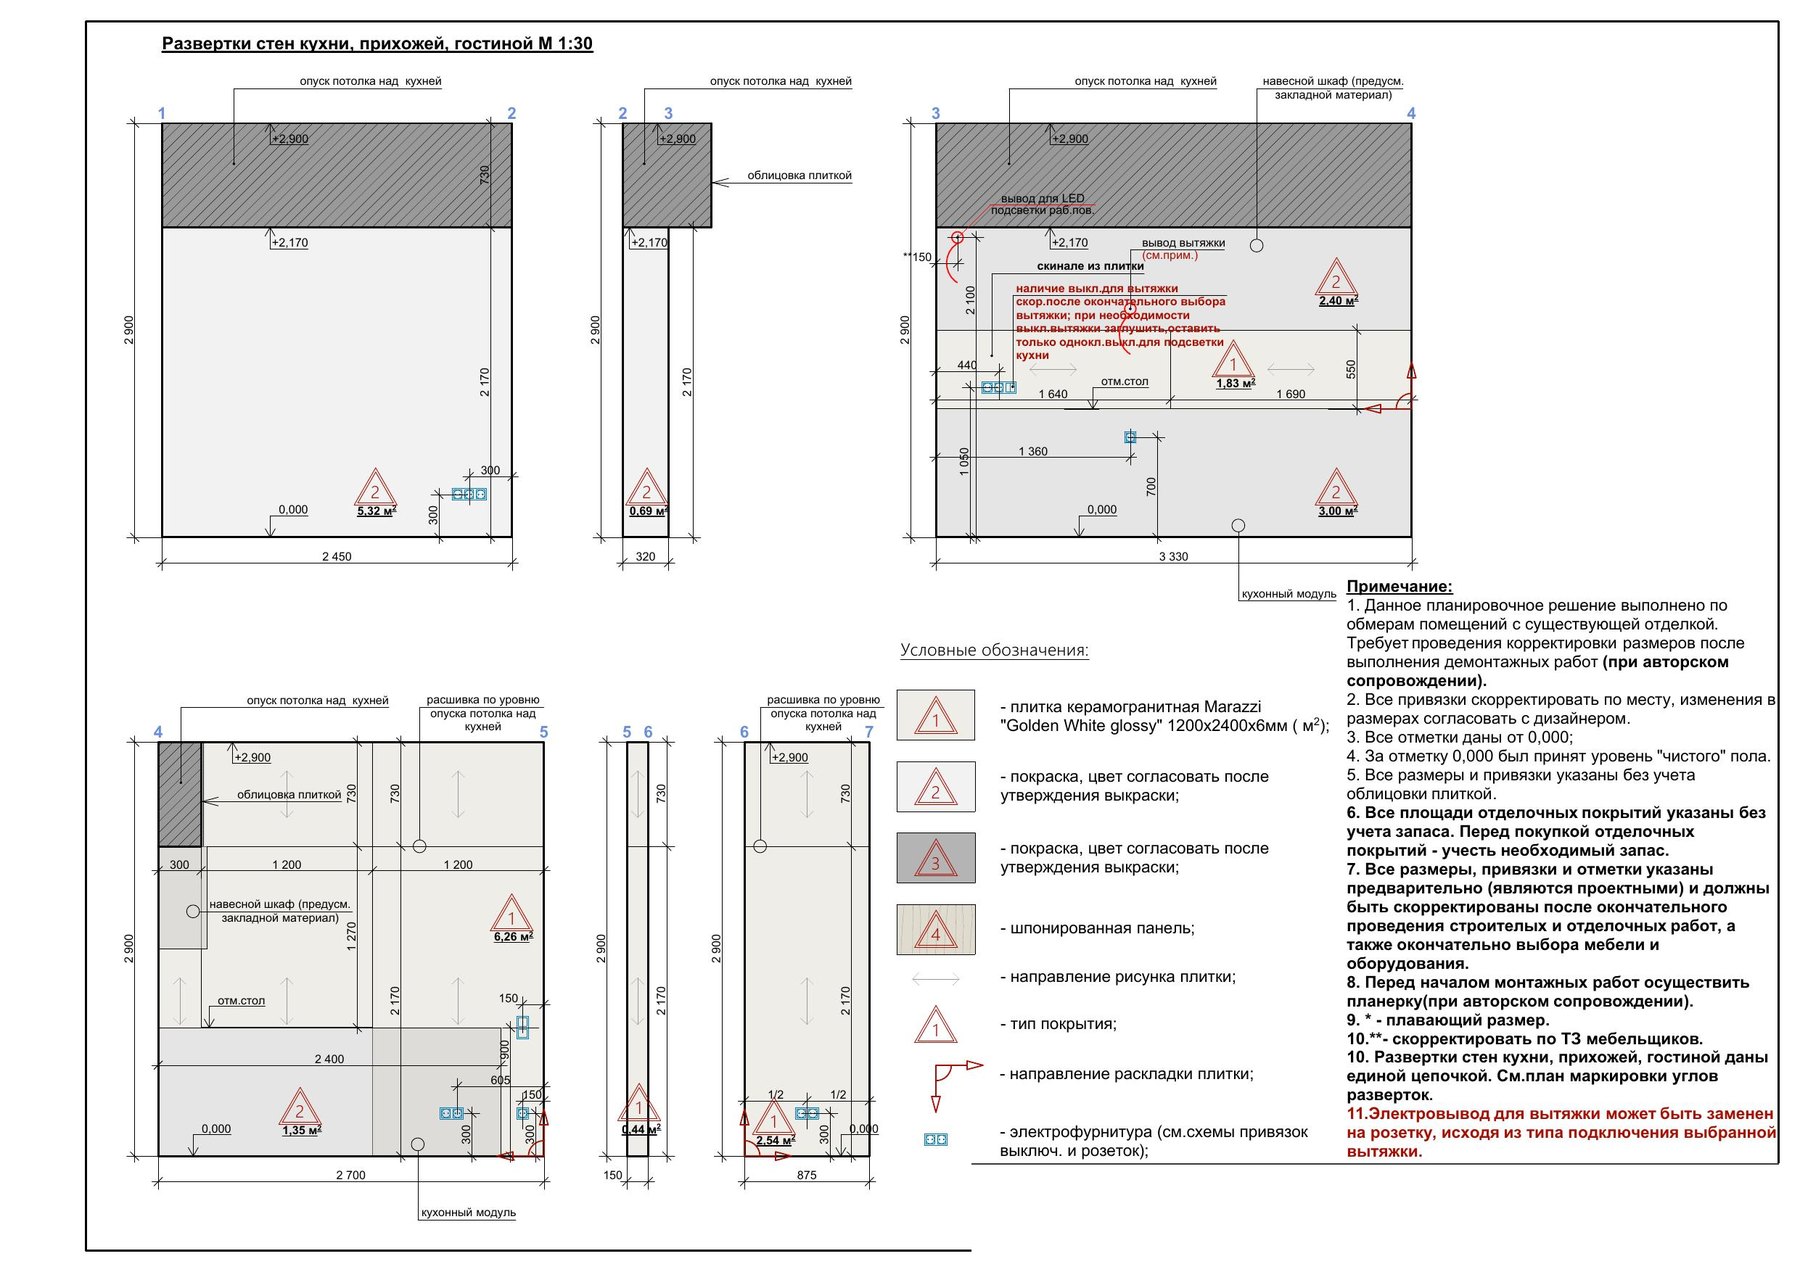
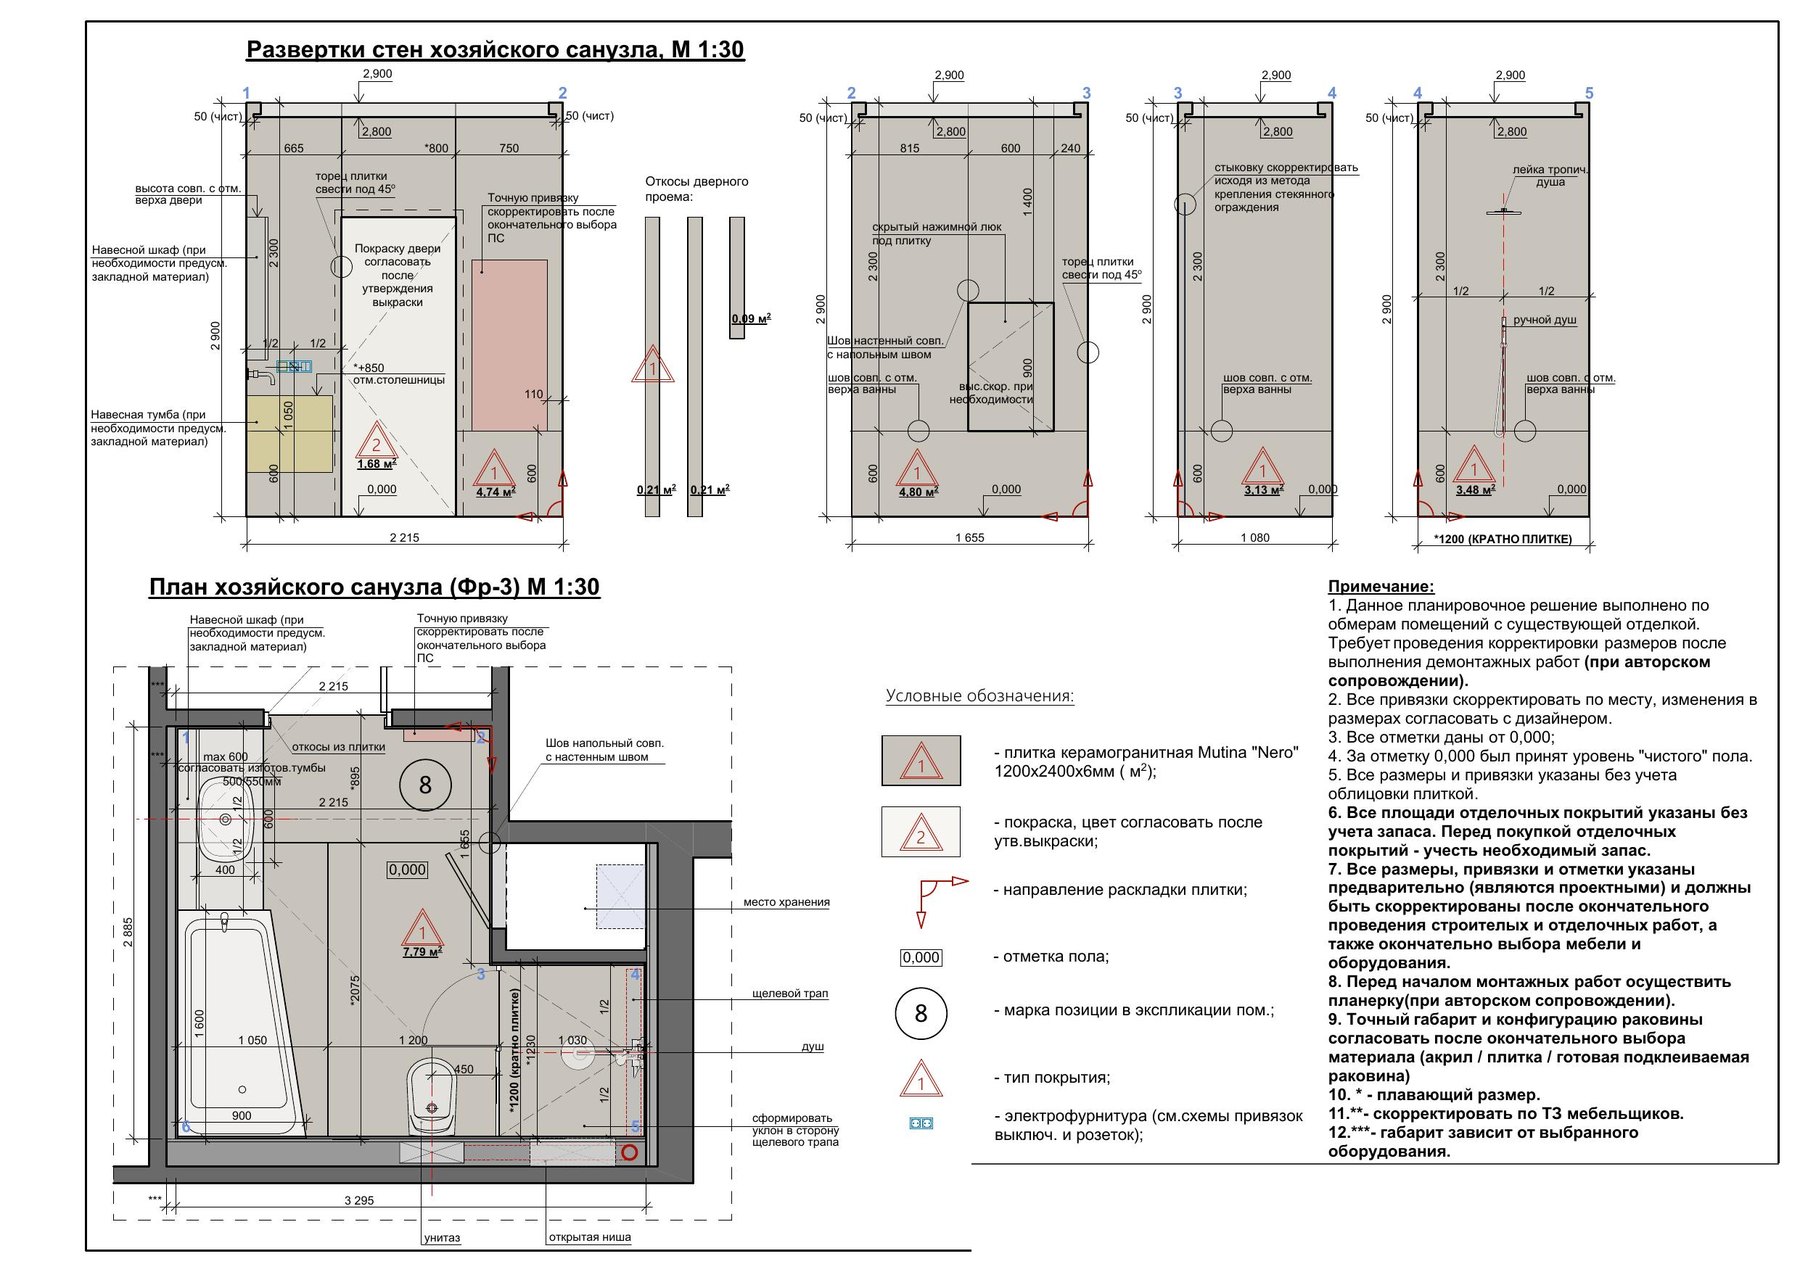
The most labor-intensive part of the set is the interior elevations. Every wall of every room is drawn separately at 1:30: where tile goes, where paint goes, where the wood veneer panel sits, where each transition happens, the direction of the tile pattern, the height of every outlet, switch, and fixture, and the finish area of each wall.
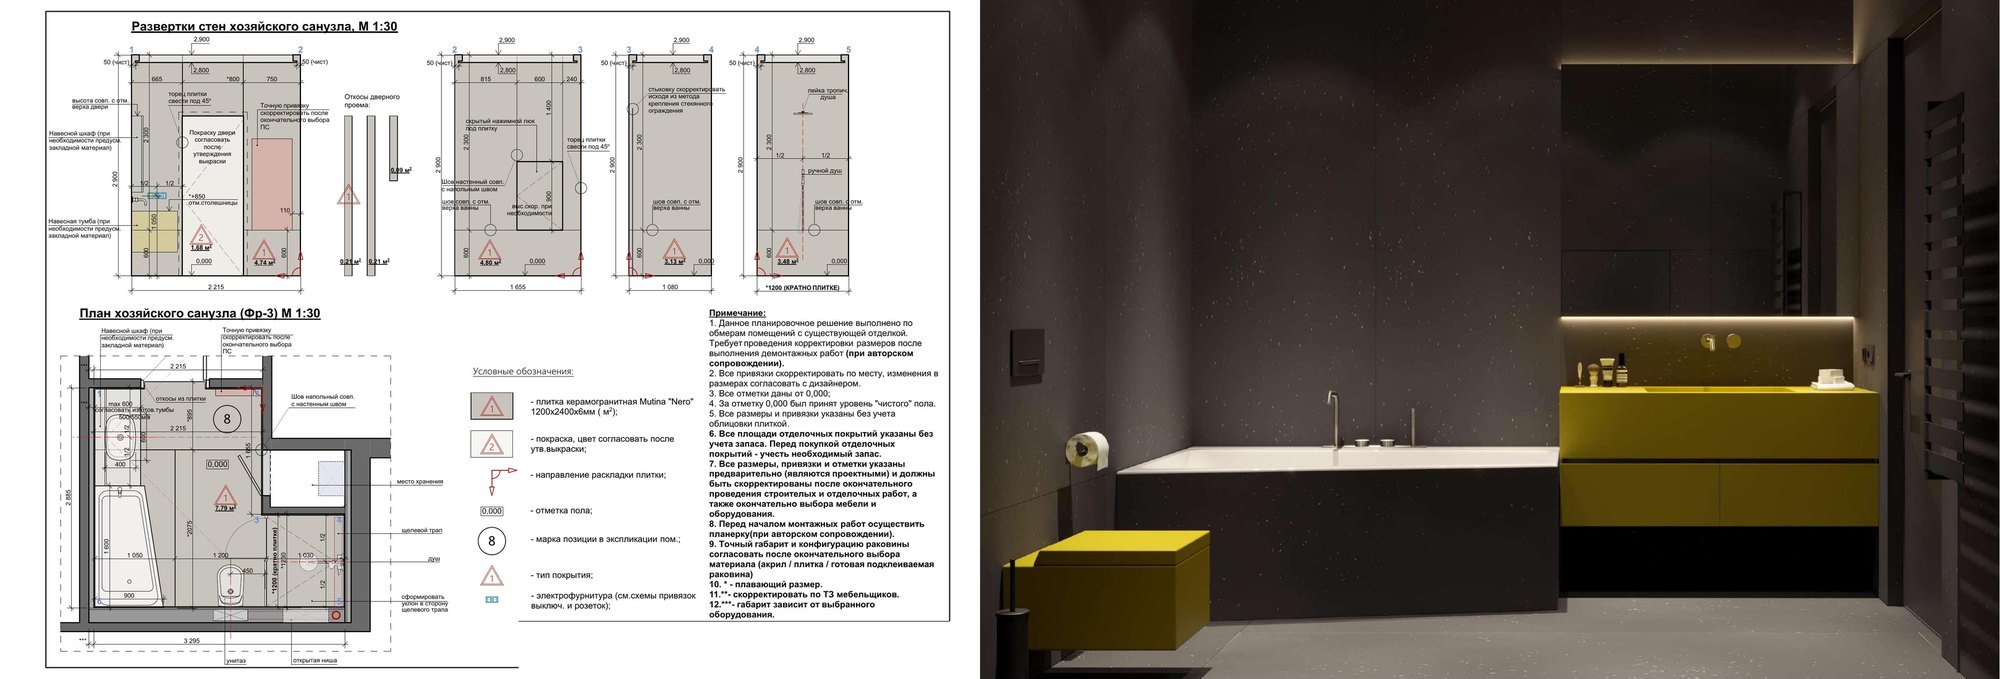
The kitchen elevations resolve things the floor plan simply can't: where the backsplash stops, where the LED task lighting connection sits, where the range hood connection goes, and how high the upper cabinets sit relative to the soffit. The bathroom elevations lay out large-format tile so the joints line up with the door and the concealed access panel, and the floor slopes toward the linear drain.
For the tile setter, the elevation is the instructions. Without it, they decide which corner to start from - and a sliver cut lands in the most visible spot, with an outlet landing on a grout joint or the edge of a tile. Large-format 1200×2400 porcelain doesn't forgive those decisions: one ruined slab means hundreds of dollars and weeks waiting for a new batch.
Stage 5. Millwork: the cabinetmaker's brief
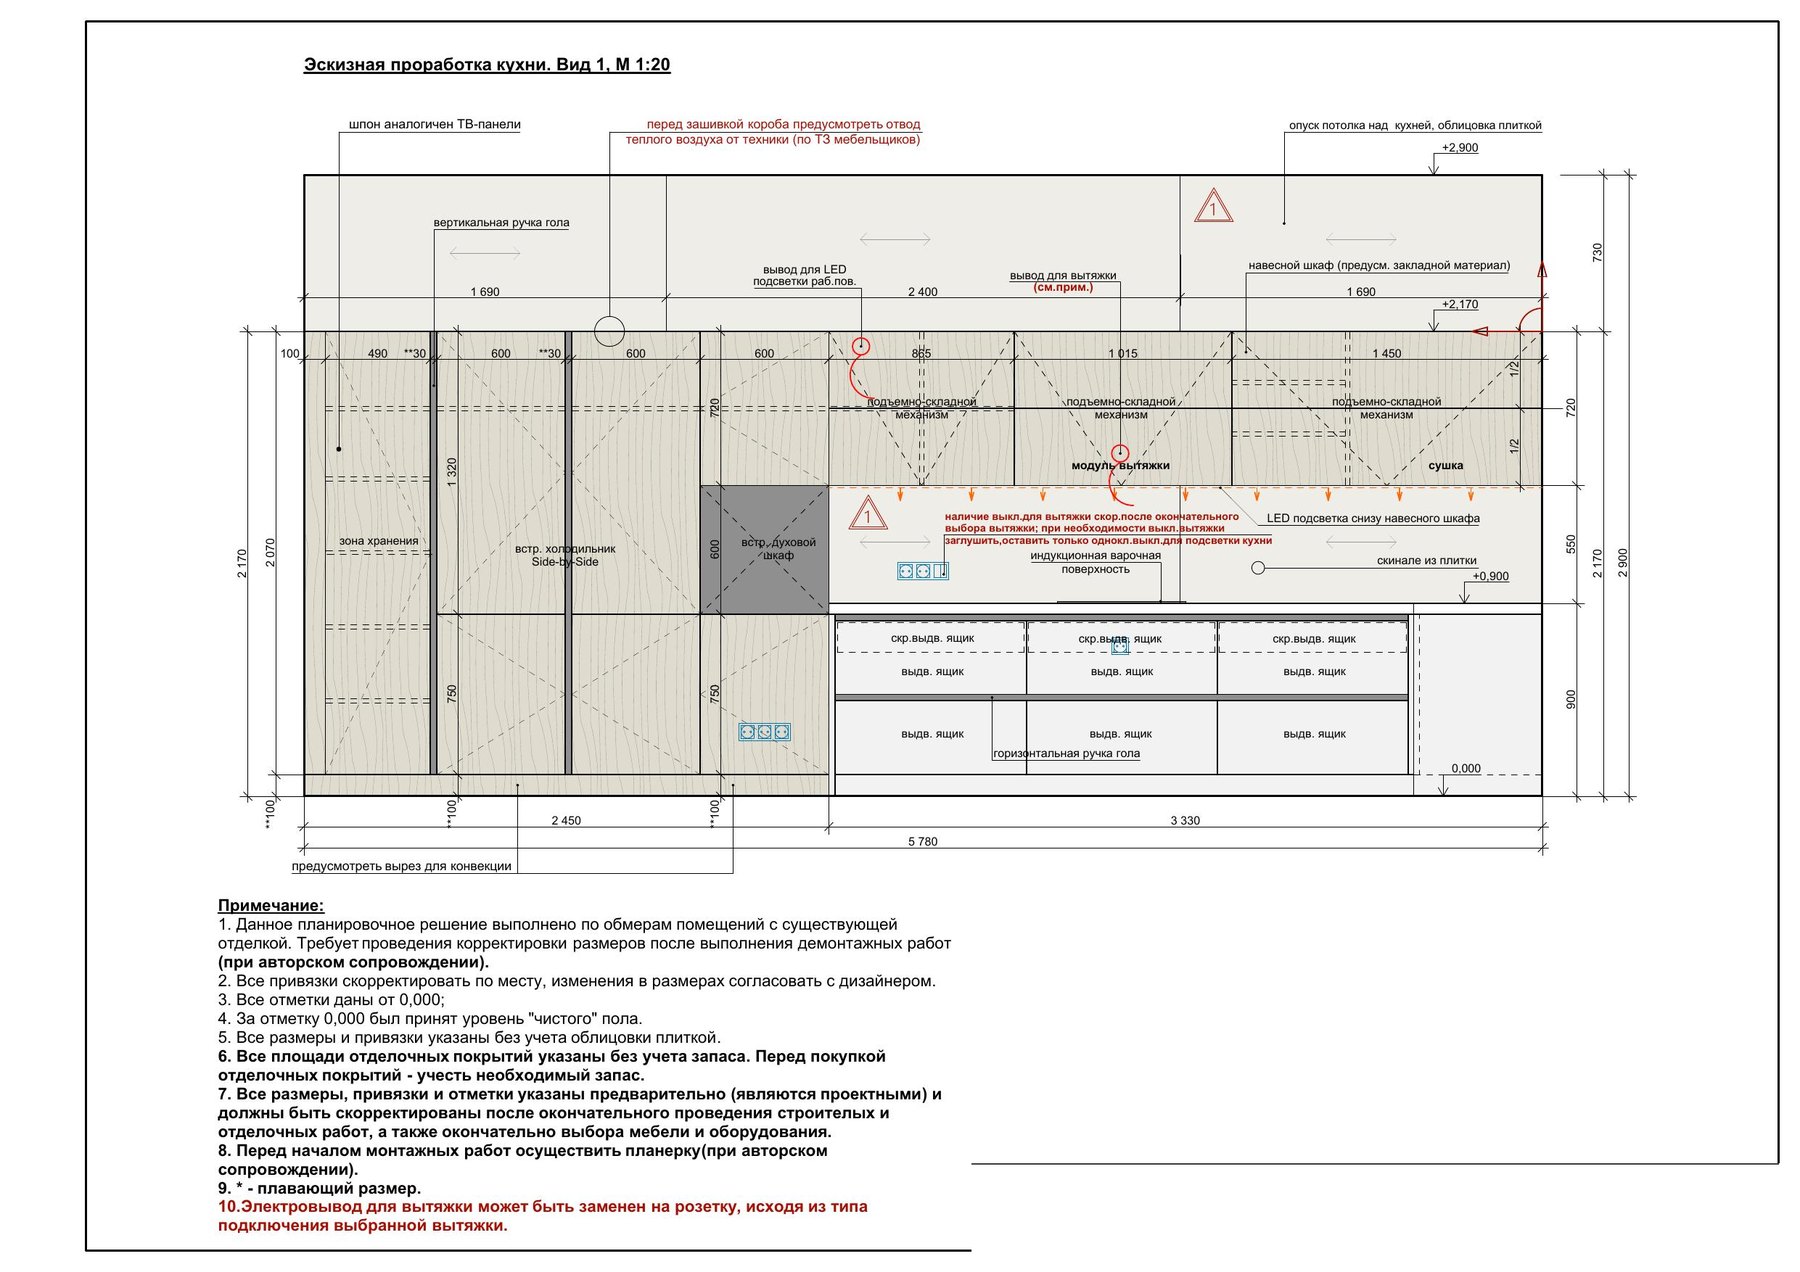
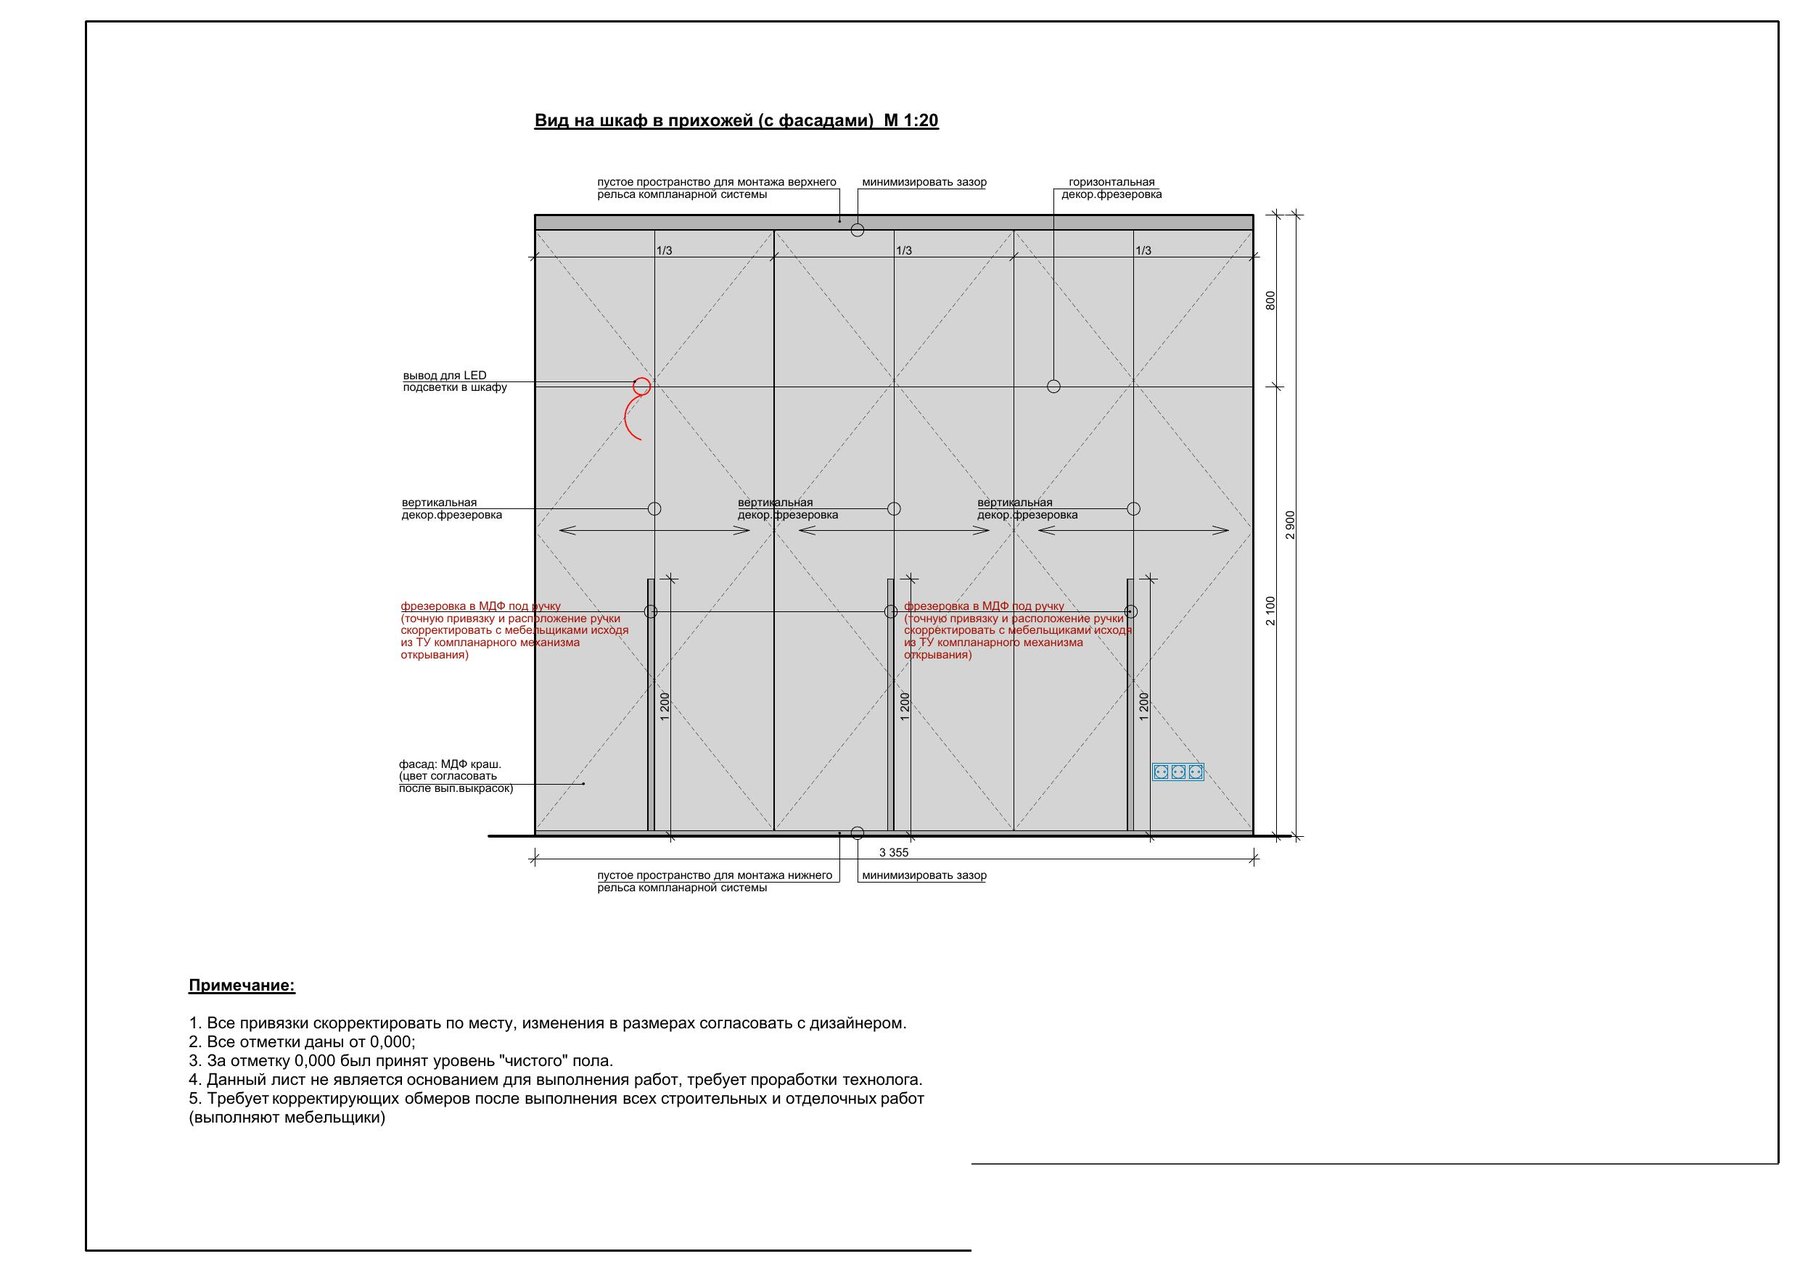
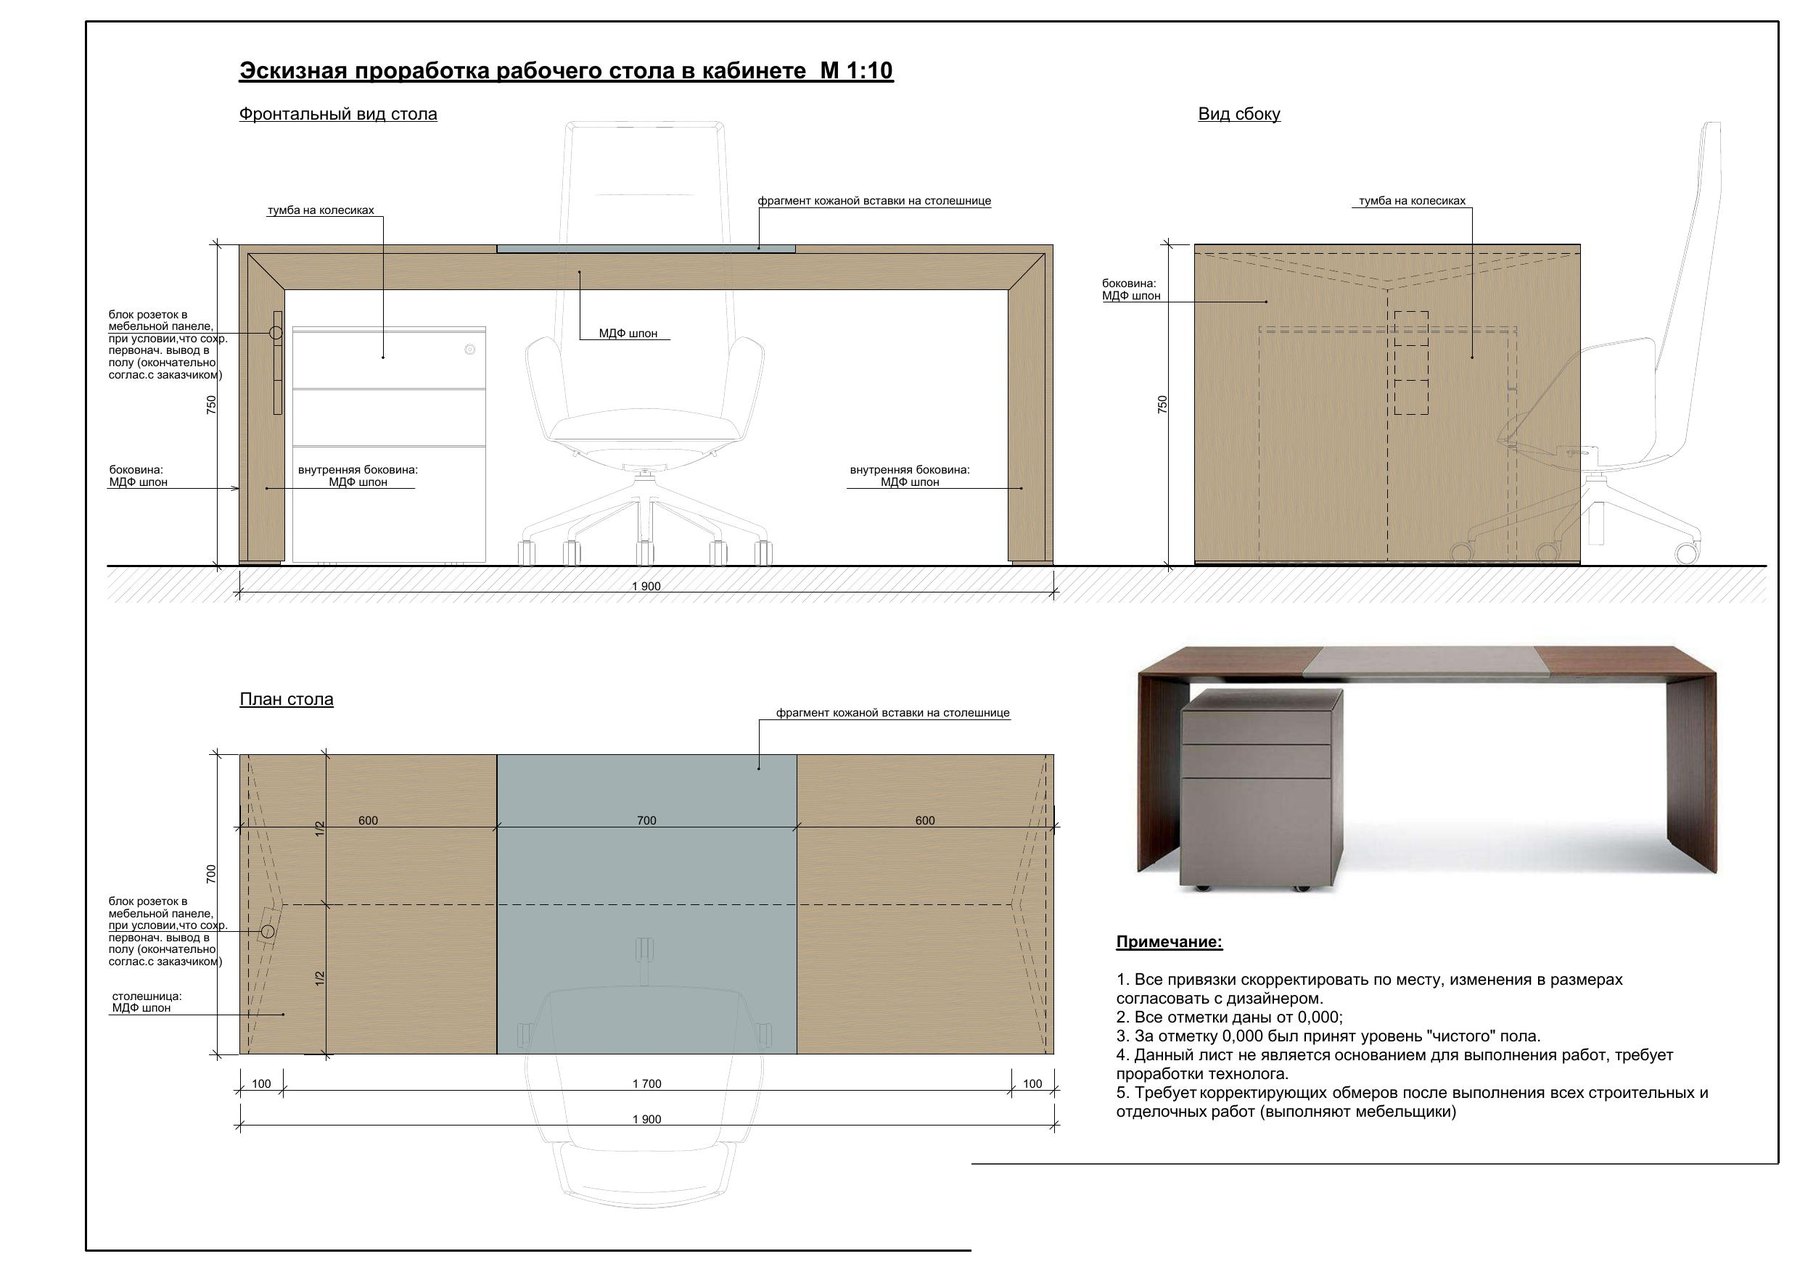
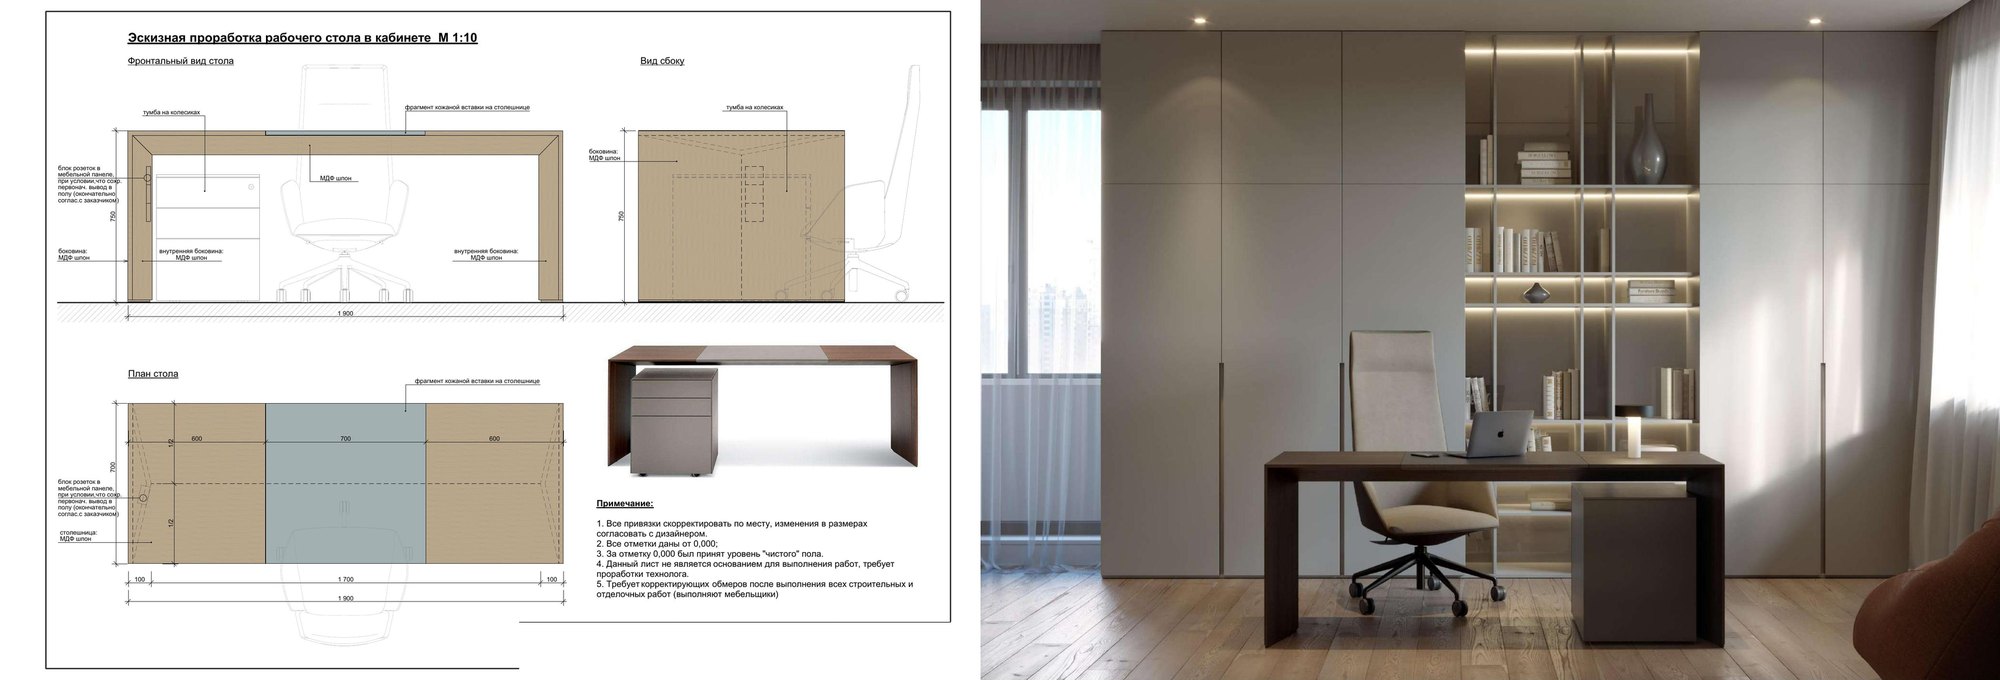
Custom casework - the kitchen, closets, nightstands, the office desk - has its own design drawings in the set at 1:20 and 1:10. Not "a closet roughly like this," but overall dimensions, divisions, door and carcass materials, hardware type, lighting locations, and installation clearances.
This is where you can see a designer thinking several steps ahead. The kitchen drawing notes: before closing in the soffit, provide a path for hot air to exhaust from the appliances per the cabinetmaker's specs. Next to it - a note about the range hood connection and the LED strip under the upper cabinets. Every one of those lines is somebody's potentially rebuilt wall or kitchen module if it's missing.
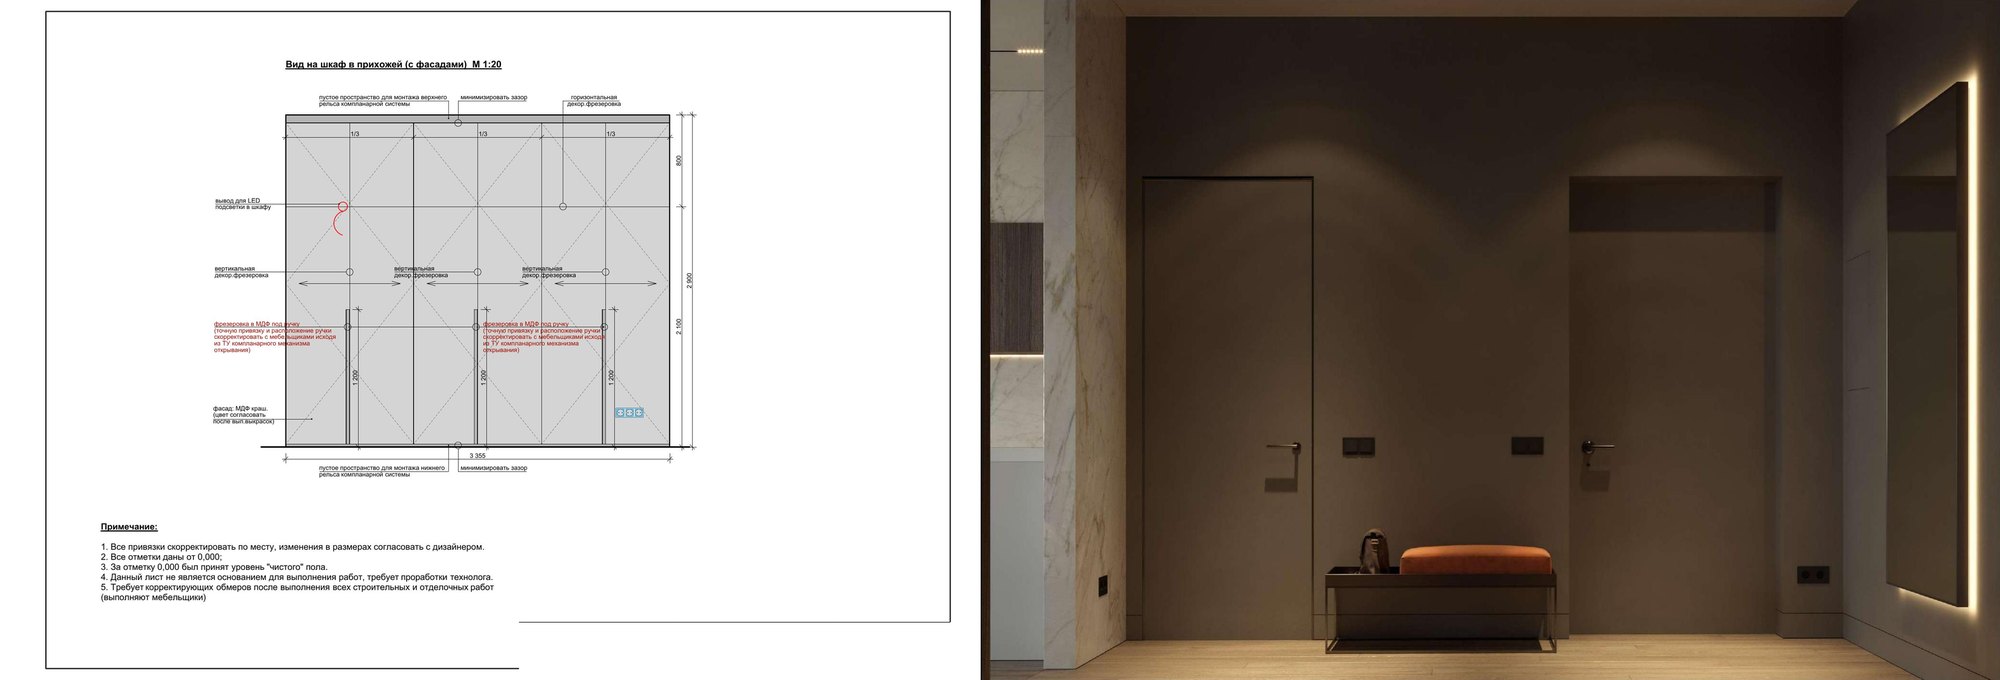
The set separately details the entry closet with a coplanar sliding door system, the office cabinet, both nightstands, a wall-hung console, a desk with a leather inlay in the top, and even a cabinet for a stacked washer and dryer - with clearances for the hookups.
These drawings don't replace the cabinetmaker's shop drawings - the notes say directly that the fabricator confirms dimensions after partitions and finishes are complete. But they define what exactly is being built, so the furniture becomes part of the interior rather than a collection of separate objects. That's exactly why outlets, lighting, and wall blocking get designed together with the millwork, not separately. This is the part of the work we handle under furniture selection.
Stage 6. From drawing to result
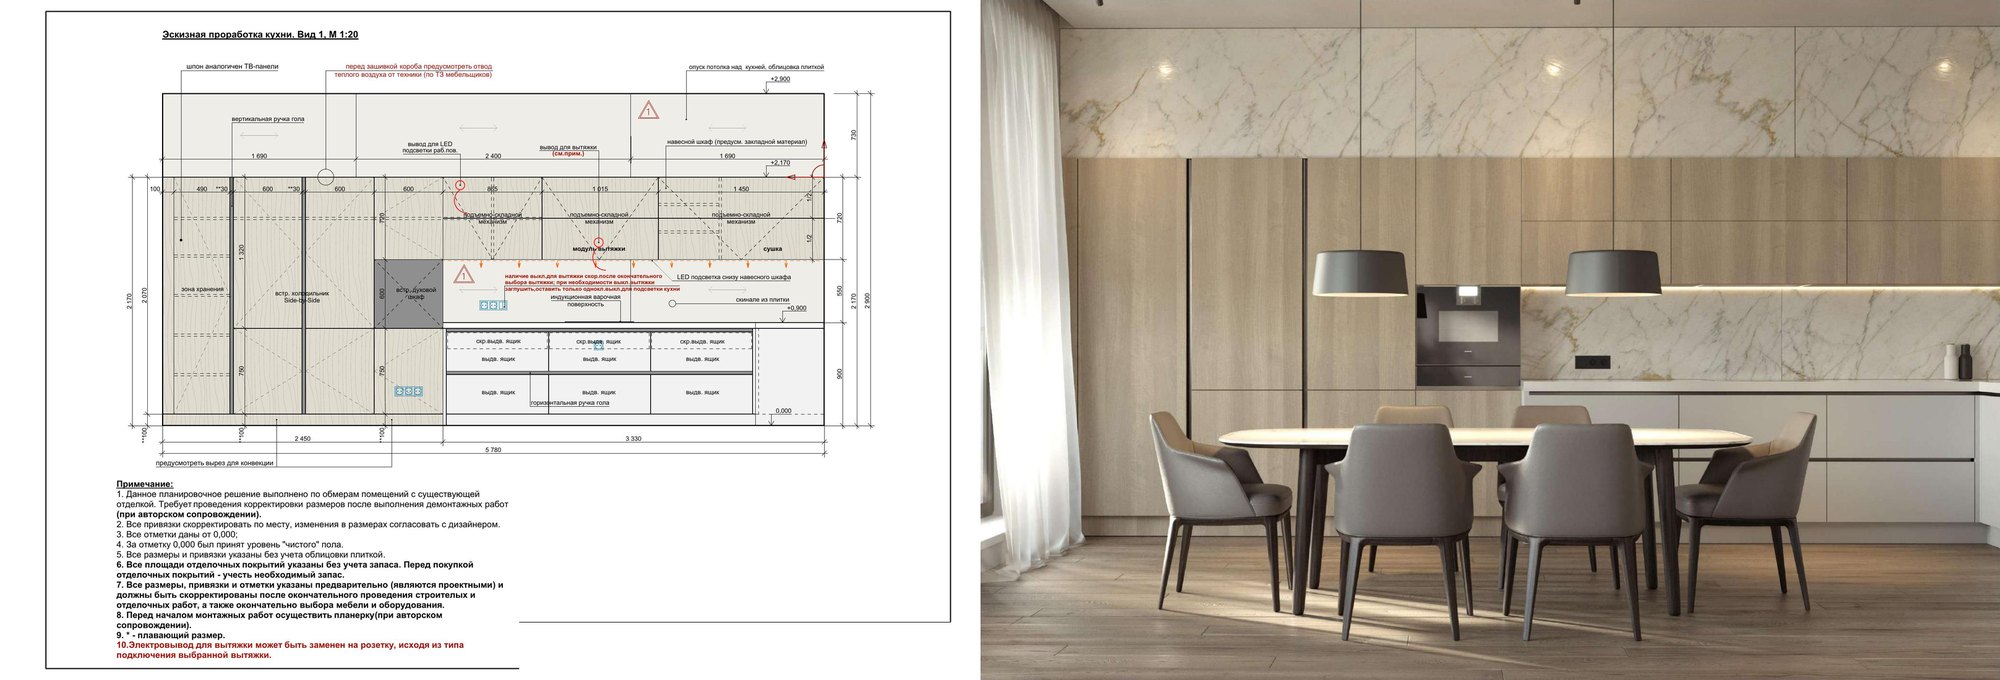
Renderings fill the last third of the set - 33 views across 24 sheets. But their value isn't that they look good. It's that each one matches the drawings exactly. Here are a few pairs: on the left, a sheet from the set; on the right, what it becomes.
Kitchen. A 1:20 drawing with door divisions, built-in appliances, and lighting - and the finished interior with the same proportions.
Home office. A desk with a leather inlay and a rolling pedestal - from drawing to space.
Primary bathroom. Elevations with tile layout and fixture heights - and a result where every joint and fixture sits exactly where it was intended.
Entry. A closet with coplanar doors and a backlit mirror.
That's why interior renderings without drawings are a promise without instructions. They show how it should look, but not how to get there. We've written in more detail about the role of 3D visualization in a project, and its limits, in a separate article.
Small mistakes, big invoices
A renovation without working drawings rarely fails all at once. It fails slowly, through small decisions made on the fly. Each one looks minor on its own:
the outlet ends up behind a cabinet because the electrician didn't know where the cabinet would go;
the range hood connection doesn't line up with the kitchen module, so the soffit gets rebuilt;
there's nothing to hang the upper cabinet on because no blocking went into the partition;
the light switch lands behind the open door;
the radiant floor thermostat sits exactly where a cabinet will go later;
tile gets ordered "with extra," then more gets ordered - and the new batch is a different shade;
a closet built to pre-plaster dimensions won't fit the niche;
the AC point gets roughed in "at around six and a half feet," and the unit you actually choose has different dimensions.
The problem isn't the mistakes themselves - it's when they surface. Almost always after the finishes are done, when the fix cuts into completed surfaces. And almost always the fix takes not one trade but several in sequence: someone to open it up, someone to redo it, someone to close it back up, and finally someone to restore the finish.
In the US, where every service call carries a minimum charge regardless of how long the job takes, that math is especially unforgiving. A handful of "small" fixes can easily exceed the cost of the entire design project that would have prevented them. We've collected the most common of these mistakes in our article on 12 interior design mistakes.
Who pays for a mistake in the drawings
This is worth saying plainly, even if it's uncomfortable. When a project has an error - a countertop height nobody accounted for, an outlet that lands behind a cabinet side, a connection that doesn't match the appliance - the fix isn't paid for by the designer who made it. It's paid for by the owner.
The electrician, the drywall finisher, and the painter will bill for their work no matter whose fault it was that it had to be redone. A poor design set doesn't eliminate the cost - it just moves it to a later, more expensive stage.
That's why the quality of a design project isn't measured by how beautiful the renderings are, but by how carefully the drawings are coordinated with each other: whether the outlets on the electrical plan match the furniture on the layout, whether the elevations account for backsplash height, whether the connections match the actual dimensions of the chosen appliances.
How to evaluate a design project before you pay for it
If you're choosing a designer, ask to see a complete drawing set from a past project, not just a portfolio of renderings. Here's what it should contain:
a measured plan with a photo survey of existing conditions;
a furniture layout and a partition plan with marked openings;
separate plans for outlets, switches, lighting, radiant heat, and AC - with locations and heights;
a reflected ceiling plan with details;
a flooring plan with specific materials and quantities;
elevations of every wall in every room;
drawings for custom millwork;
a single elevation datum and notes explaining what needs to be confirmed, and when.
If what you're offered instead is "renderings plus a general layout," you're buying a picture, not a project.
Why the drawing set isn't the whole story
One phrase repeats several times in the notes of this set: "with design supervision." Hold a coordination meeting before installation starts. Approve every dimensional change with the designer. Adjust floor elevations after the plumbing fixtures are finalized.
That's an honest acknowledgment that every project eventually meets the reality of the site. The drawing set defines the decisions; project support makes sure they get built - even when, after demolition, a wall isn't where it was expected to be, or a supplier swaps a light fixture for a model with different dimensions.
Conclusion
An interior design project isn't a picture of how beautiful it will be. It's 68 sheets of answers to questions that would otherwise get settled on site, in a hurry, by people who can't see the whole picture.
Renderings show what the interior will look like. Drawings explain how to build it. Supervision makes sure what gets built is what was drawn. Without any one of those, the outcome comes down to luck - and every bit of bad luck has its price in specialists' billable hours.
Frequently Asked Questions
Can I get by with just renderings? Renderings show the result, but they don't give the trades dimensions, heights, or locations. In our example, renderings take up 24 of 68 sheets - the rest are the drawings contractors actually work from.
Who uses the drawings in the set? The framing crew uses the partition plan; the electrician uses the outlet, switch, and lighting plans; the ceiling installer uses the ceiling plan and details; the tile setter uses the flooring plan and elevations; the cabinetmaker uses the millwork drawings.
How much does it cost to move one outlet after finishes are done? In the US it's typically three separate service calls - electrician, drywall finisher, and painter - and $550 to $850 or more in the Seattle area, plus several days for joint compound to dry between coats.
Why draw an elevation for every wall? A floor plan doesn't show heights. An elevation shows where the tile stops, how high the outlet sits, where the lighting connection goes, and which corner to start the tile layout from so there's no sliver cut in a visible spot.
Why does the project need adjusting after demolition? Measurements are taken over existing finishes. After demolition, the real wall geometry can be off by an inch or more, and furniture and equipment dimensions get confirmed against what's actually there.
Who pays if there's a mistake in the drawings? In practice, the owner. Contractors bill for rework regardless of whose error caused it. That's why the quality and coordination of the drawings matter more than how good the renderings look.
Need a design project you can actually build from?
We produce the complete drawing set - from measurements and electrical plans to elevations of every wall and millwork drawings - and supervise it through construction. See how this project turned out, or learn how we work.